Adjusting the Headlamps
The headlamps on my car were poorly aimed. The light cut off in the pattern hit the ground no more than 50 feet in front of the car. The high beams were aimed at the trees and not down the road.
My thanks to Daniel Stern Lighting for comments, corrections, and specifications. His website is informative and his aiming instructions are exceptional.
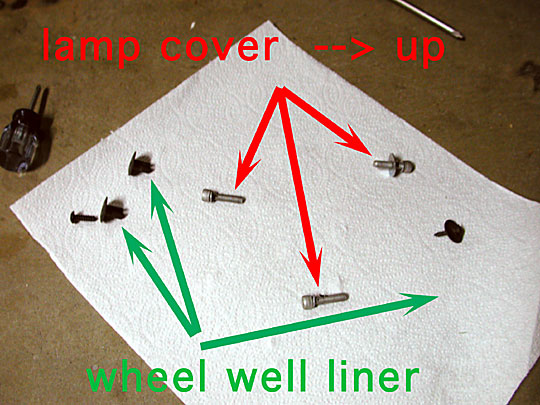
Remove the Wheel Well Liner
The cover can be removed by first removing the wheel well liner. Turn the wheel so that it points left for the left side and right for the right side.
There is a screw at the top and two plastic retainers at the bottom that hold the wheel well liner in place. The retainers have plastic screws through the retainer which spreads the fingers. Remove the plastic screw and then pull the retainer out. The upper screw is conventional and has a washer to spread the load. (See picture of nuts and bolts at the end.)
The liner can then be removed by pulling the bottom towards the wheel and then raising the liner to unhook the top tab.
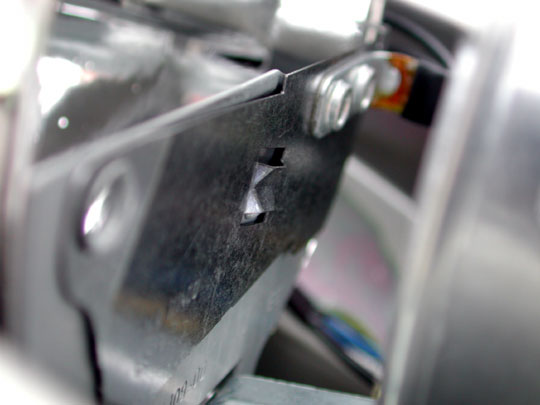
Remove the Headlamp Cover
The headlamp cover is held on by three allen head screws, visible on the backside of the headlamp area. Remove the three allen head screws, with the upper having a washer to spread the load. Do not remove the nyloc nuts, mounting nuts, as these hold the lamp mounting bracket inside the headlamp area.
The cover can now be gently pried upwards and away from the car body.

Light Patterns and Shutters
The high beam light pattern is a bright spot. The light is focused down the road and is intended to light the way at high speed. The spot should be level with the lamp and pointing directly in front of the car.
The low beam is used when there is on coming traffic. It is aimed so that it does not shine in the eyes of the on coming driver. There is a cut off shutter in the light assembly that prevents the light from shining above a certain level.
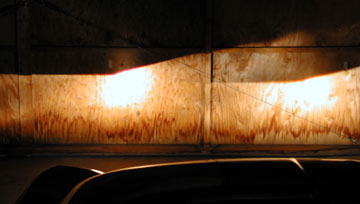
The Elise pattern shows a horizontal level cutoff to the left and a flair up and to the right. This provides illumination to the right side of the road. The bright spots in the center are not the high beam illumination pattern but are an artifact of the photography.
The low beam headlamp is equipped with an adjustable shutter. Note the edge and how it drops after the middle. Also notice the shutter with the handle and the detent. When in this position, the light will flair up and to the right. (The light will become reversed and inverted as it passes through a lens, which is to the right.)
Here the shutter is in the up position, preventing the flair pattern, and providing a level cutoff.
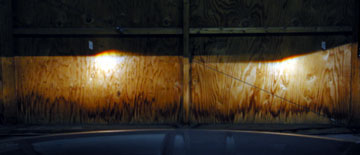
This pattern shows an example of a flair on the right and the level cutoff on the left.
Daniel Stern Lighting
My thanks to Daniel Stern Lighting for comments, corrections, and specifications. His website is informative and his aiming instructions are exceptional. He provided the following:
The Elise is equipped with European-specification headlamps, due to a Federal waiver of requirements contained in FMVSS 108 (which ordinarily requires US DOT headlamps). The purpose of that adjustable cutoff shield is so that the car can safely (and legally) be driven in left-traffic countries. When the owner of a car like this takes the Chunnel to England, for instance, he would legally be required to shift the shields to flatten the cutoff. This does compromise and weaken the light pattern and severely reduces down-the-road seeing distance; permanent moves to an opposite-traffic country require replacement of the headlamps with proper left-traffic units which have the upsweep to the left rather than to the right.
For use in North America, the adjustable cutoff shield should ALWAYS be in the "retracted" position so that the upsweep to the right is present.
You see the decal that states "1.5%" on the headlamp? That is a European aim type-approval specification. Setting the lamps to this aim declination results in ridiculously short seeing distance.
The low beams are 57 cm (22.4 inches) above the road surface.
With aim set to the decal spec of 1.5%, that is 0.86° declination. By trigonometry, seeing distance will be a paltry and wholly inadequate 38 metres (125 feet). Travelling at 60 miles per hour means 88 feet per second, which means the headlamps provide a preview of 1.42 seconds -- most of which will be consumed by reaction time after an object shows up in the headlamps.
With aim set to the US "VOL" spec of 0.7%, that is 0.4° declination. Seeing distance will be a MUCH more adequate 82 metres (269 feet), giving a little over 3 seconds' preview at 60 miles per hour -- a much safer state of affairs.
So as described here, you can see why aim precision matters, and why a beamsetter, properly used, is the best way to do it; marks on a wall and so forth can't achieve the necessary precision.
There is another option which some drivers may prefer: swing the tourist lever into position, creating the level cutoff, then set the cutoff (not the hot spot, but the cutoff) directly at the horizon -- that is, use the "VOR" spec to set the cutoff height at exactly the centreline height of the low beam projector, 57 cm in your case, at a distance of 25 feet (or preferably with a beam setter). This will give longer seeing distance on the left, somewhat shorter on the right, relative to the non-tourist setting aimed per VOL.
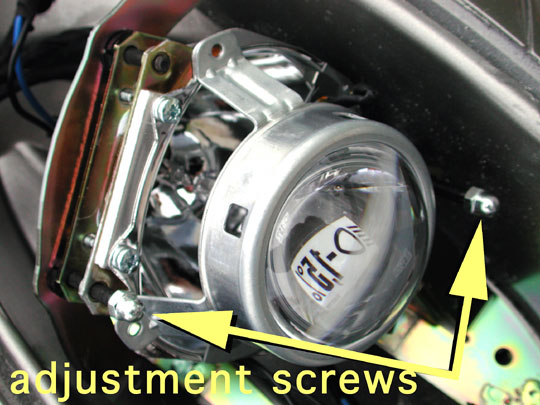
Adjusting the Headlamp Aim, Low Beam
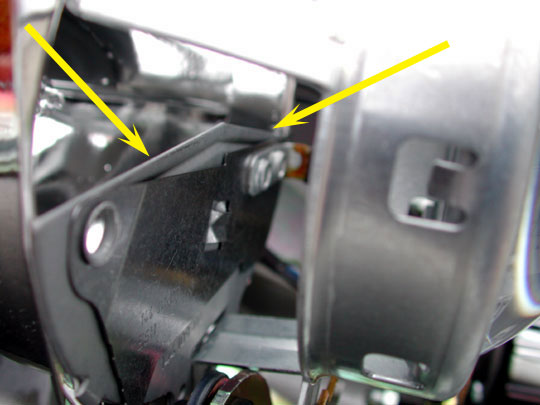
The low beam is the assembly on top. There are two adjustment screws and one location screw. While it is easier to adjust the lamp with three screws of a tripod, it is possible to point the beam with two. Turning the screw clockwise pushes the lamp away from that direction, and counter-clockwise pulls the lamp that direction. The adjustment screws point towards the front of the car.
Note the specification tag that is reflected in the lens of the assembly, indicating the lamps confrom to ECE Regulation 112. As Daniel Stern Lighting points out, this is not the declination specification, as I originally thought.
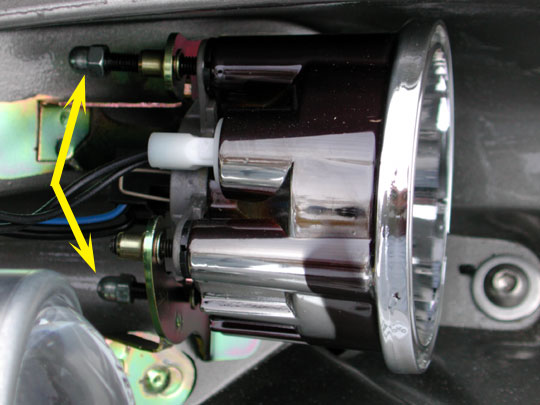
Adjusting the Headlamp Aim, High Beam
The high beam is the assembly on the bottom. There are two adjustment screws pointing towards the back of the car. These work the same as the low beam unit.
Final Headlamp Pattern
The light pattern needs to be adjusted according to the car center line and level with the headlamps. The center and level spots need to be marked on a wall in front of the car and the light spots adjusted accordingly. I used the following method:
- project a laser along the center line of the car, from the key lock for the boot, along the center of the radiator vent, to the wall.
- mark a spot at headlight height in front of the rear wheel fender and in back of the front wheel fender. Shine a laser from the back wheel, past the mark on the front wheel fender, on to the wall. This line is level with the car and is at the height of the head lamp.
- measure how far the headlights are from the center of the car.
- measure two spots on the wall at the same level as the spots in step two and the same distance horizontally from the center mark as step three. These spots are directly in front of the headlamps of the car.
The low beam headlights can be aimed slightly below these marks, with the flair happening just to the right of the marks. You can make a calculation that indicates how far below the mark by using trigonometry and the distance the car is away from the wall. If you do not want to try and remember your high school trigonometry, Daniel Stern Lighting has an excellent description on how to aim headlights.
Again from Daniel Stern Lighting: In Europe, the nominal aim for headlamps at low mounting heights (and the Elise certainly qualifies!) is 1%. In the US, the nominal aim for headlamps with this type of beam pattern at *all* mounting heights is 0.7%. These might seem like picky differences, but the effect upon seeing distance is very large, especially at low mounting heights.
Cutoffs set to 2.1 inches below low beam centreline height, at a distance of 25 feet); this would correspond to the US 0.7% aim declination.
The high beam headlights should be aimed at the dot. The dots, actually tape with pencil marks, are shown below are in order of left side level (step 2), left headlight center (step 4), center of the car (step 1), right headlight center (step 4), right side level (step 2). The center spots are indicated with the blue arrows.

Assembly
(I love saying this, "assembly is the reverse of disassembly...")
Put the headlight cover back on first. Check to make sure the cover bezel does not press against or interfere with the headlamp assembly. The bezel will press against the lamp and cause the aim to change. I needed to grind down some of the plastic on the bezel to prevent this from happening on my car.
The allen head screws retain the headlight cover. The screw with the washer goes on the top.
Put the wheel well liner back on. The metal screw with the washer holds the wheel well liner at the top hole and the fasteners go into the two holes at the bottom, followed by the plastic screws.