
How to Change Your Oil
It is more difficult to change the oil in a Lotus Elise because the oil plug and filter are difficult to access. They are located behind an access panel. In order to remove the access panel, the car must be raised. As a result, the dealer will charge $300 or more for an oil change. Changing your own oil is easy and provides a good first step in learning how to take care of your car.
Please do not attempt this if you do not have the proper equipment and if you are not confident of your abilities I can accept no responsibility of you damage your car or hurt yourself.
Basic Steps:
- raise one side of the car
- remove the access panel
- place car on jack stands
- drain oil
- remove oil filter
- install new filter
- replace oil plug
- remove jack stands
- replace panel
- lower car
- add oil and test
Tools and Materials
- oil filter
- oil plug gasket
- 5 quarts oil (Lotus recommends Havoline 5w-40 synthetic, similar is OK)
- Allen head wrench (remove access panel)
- 10mm hex head socket (remove access panel)
- wheel blocks (any wood pieces)
- automobile jack
- oil filter removal tool (not essential but recommended)
- two jack stands (not essential but recommended)
- torque wrench (not essential but recommended)
- funnel
- drain pan
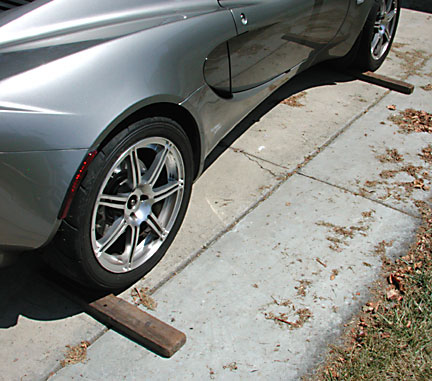
Block both the front and rear wheels on the opposite side of the car that you are going to jack up first. You can use any piece of wood or other stable material that will not roll. Slide the wood up against the tire.
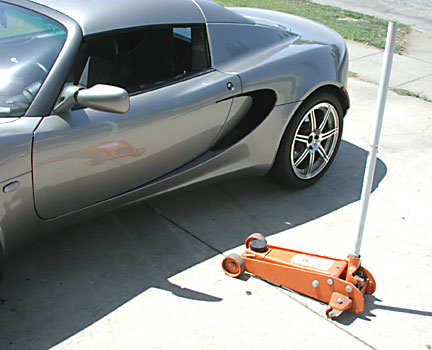
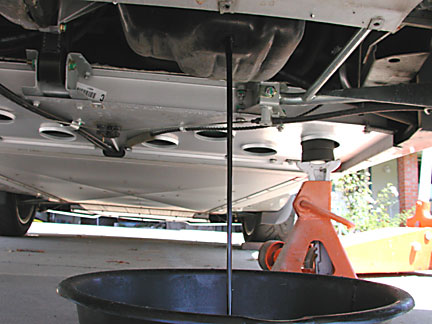
The jack is ready to be placed under the car. Notice the saddle, the part that touches the underneath part of the car, has a rubber disc on it. This is to distribute the load and not dent the bottom of the car. Use of a wide saddle, with an uneven surface will scratch and dent the fragile part of the bottom. The rubber disc is a hockey puck and is available at any sporting goods store.

The above picture is from the Lotus Service Manual page about jacking the car. You should have the Service Manual as it costs $25 to download one from the Lotus Cars USA website. The car can be jacked from either side at point A. Once raised and the access panel removed, you can then support the car at points C with jack stands.

Examine the bottom of the car and look for the blue and white lift sticker. It has the symbol of a jack on it. Place the rubber disc under this sticker and start lifting the car.
I do not recommend using just a jack to lift the car in order to complete the oil change. It is possible to remove the access panel, drain the oil, and remove the filter while the car is on a single jack. However I believe this is dangerous because the car is not stable and can fall off the jack or the jack can collapse.
An alternative is to buy a couple of ramps. The ramps are for this purpose but care must be taken not to drive up the ramp and off the end. (This is easier than it sounds!)
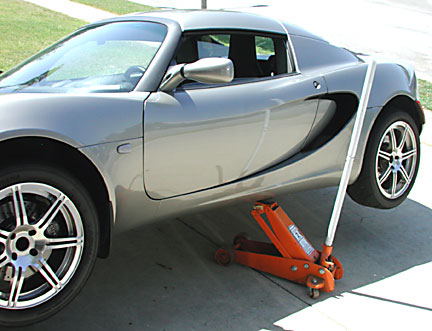
Lift the car up higher than the jack stands that you will eventually use to hold the car.
from the Lotus Service Manualjacking points and diffuser attachment the diffuser panel does not need to be removed
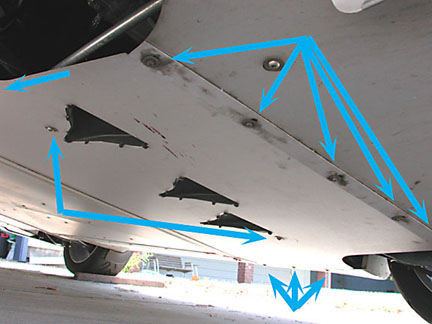
The blue arrows point to the attachment points for the engine access panel. There are three 10mm hex head bolts on either side, ahead of the rear wheels. There are two Allen head wrench bolts on either side of the NASA intake ducts (black plastic openings). And there are five 10mm hex head bolts on the trailing edge of the panel. The forward edge of the panel rests in a groove and is supported by the floor panel.
I remove the side bolts first and then remove three of the five bolts at the rear. I then remove the two Allen head bolts. Then, holding the panel up with my knees, I remove the last two hex head bolts at the rear edge of the panel. The panel is very light and can be held easily with one hand. It is not heavy and is easy to slide around. Watch out for rocks and gravel as you remove the panel as it they tend to collect inside the engine compartment. Move the panel away from the car.
(add picture)
It is now possible to see the rear jacking points of the car. Place a jack stand under the raised rear jacking point and place a rubber disc on the stand. Lower the car onto the jack stand. The support should be under the cross member. While the shear panel covering the fuel tank obscures the beam, it can be seen above the rubber disc. The suspension mounts to it as does the front engine mount.
Do not use the holes. These holes are in the shear panel to show the fuel tank.
Place the jack on the other side of the car, raise the car the same way you did the first side, and place a second jack stand. Shake the car vigorously and make sure it is stable. It is better to fall off the stands now while you are not under it, than to fall later when you are working under it. My kids think I am a safety nut and they are right.
The car is now raised and you now have easy access to the engine compartment. Shake the car again to make sure it is stable on top of the stands. Reposition the stands if there is any movement or noise.
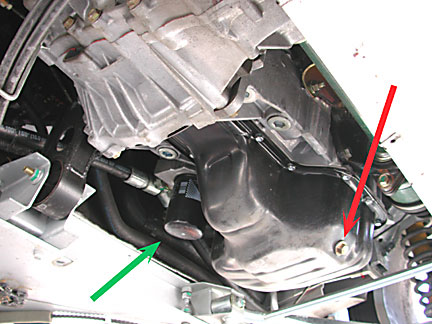
The red arrow points to the oil drain plug at the bottom of the oil pan of the engine. The drain bolt head is 14 mm. The green arrow points to the oil filter. Note that left is towards the front of the car. The grey finned casting at the top is the transmission and differential.
Remove the oil drain plug and take your hand out of the way quickly as the oil starts to pour out. Do not worry if you drop the plug in the pan, every one does it. Do worry if you see or hear bits of metal falling from the car into the drain pan as this is usually an indication of something broken inside the engine. This is not likely as the Toyota power plant has proven to be very reliable.
Once the oil has stopped pouring out, replace the drain plug and tighten. Every little drop does not need to be removed and the plug can be replaced when the flow has started to drip.
Use the new plug gasket on the plug. You did purchase a new gasket when you purchased your filter, right? The torque for the oil pan drain plug is 27 ft-lb.
(I do recommend you purchase a good torque wrench. Ask anyone who has worked on cars and they will have a favorite story about the bolt they broke because they were tightening it too much. Watch the people who change tires and wheels frequently and you will see them always tightening the lug nuts with a torque wrench. I do not recommend Craftsman brand (Sears). My handle came loose after using it less than 20 times and Sear would not fix it or replace it because it was beyond the 90 day warranty.)
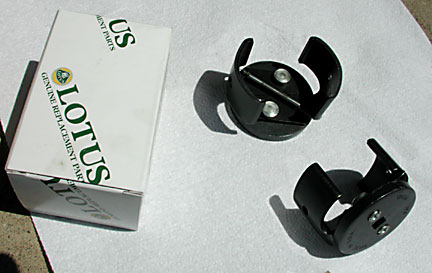
It helps to be very strong and have a massive grip when it comes time to remove the old filter I am neither. I purchased an oil filter removal tool at the local auto parts store. I recommend one that has a thick metal base, where your socket wrench attaches in the small square hole. Thin metal will bend, deform or even round off. The picture above contains two views of the tool and only one is needed to remove the filter.
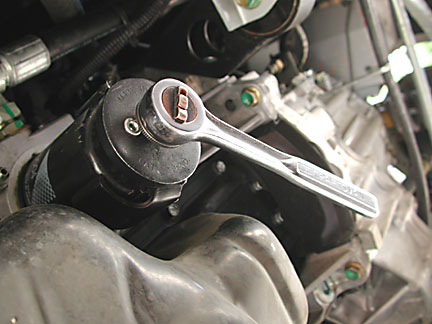
Here the oil filter is about to be removed. It unscrews just like a bolt. Watch out as more oil will drain from the sides of the top of the filter as you loosen it. Wait for it to slow and then remove the filter by unscrewing more. Please dispose of your oil and filter in such a way as not to harm the environment.
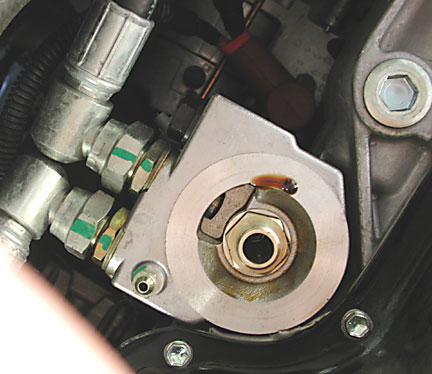
This is where the oil filter was mounted. You can see a drip of oil coming from the opening. The hoses attached to the upper left are leading to the oil coolers at the front of the car. Wipe the oil from the mount.
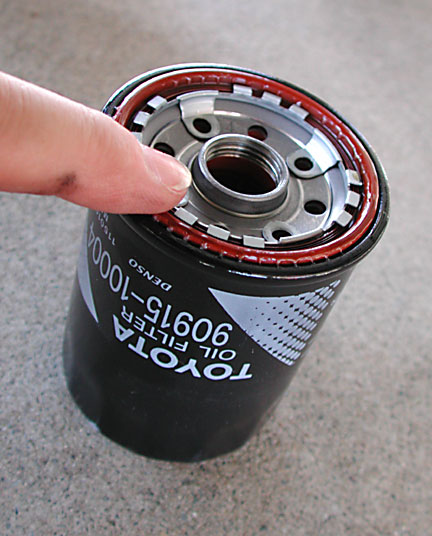
Lubricate the oil filter seal, the red ring around the opening. This will allow the seal to seat correctly on the mounting block. Note this filter is what Lotus is supplying in the Lotus labled box, as seen several pictures above.
You can also pre-fill the filter with oil. Normally, when the engine is first started after an oil filter change, the engine needs to pump oil into the filter. Once the filter is full, the oil will start flowing to the rest of the engine. During these first few seconds, no oil pressure exists in the engine, the oil light might flicker, and the moving parts are not lubricated. By pre-filling the oil filter with oil, you can avoid this problem. Pour oil into the filter and let it be absorbed. Later, when it comes time to add new oil to the engine, remember you have already filled the filter and take care not to over fill.
Spin the new oil filter onto the mount until it just contacts the surface. You can rotate the filter back and forth a bit to judge exactly when it is starting to touch the surface. Once you have that point in mind, look at the labeling on the side of the filter and imagine where it will be when you rotate the filter 3/4 of a turn (270 degrees). Go ahead and tighten the filter this amount. It will be very hard to turn for the last little bit.
You are more correct if you pour in the new oil and start the engine at this time. It is easier to check for leaks when the panel is still off. See below for a description on how to add new oil.

Jack one side of the car and remove one jack stand. Take the jack to the other side and remove the second jack stand. Replace the access panel. I lift the front edge of the panel into the groove, along where the red arrows are. Then I lift the panel into place and put two bolts in the rear edge, where the blue arrows are. Do not tighten these bolts.
I put the bolts for all the green holes and once they are all in, I tighten them. I insert the Allen head bolts in the two holes pointed to by the grey arrows and tighten them. Finally I insert the remaining bolts where the blue holes are and tighten them as well.
It helps not to tighten any of the bolts until you have them all threaded as it is possible to get one side to fit and the holes on the other side to be obscured.
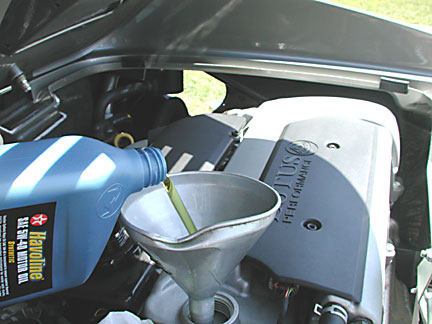
The oil fill cap is on the left side of the engine cover. I place a rag to catch any oil that spills from the bottle and pour with the opening on top, as shown. If you look closely, you will see a symbol embossed in the next of the container showing the same method. This prevents the oil from bubbling out and splashing around.
Note also the correct use of the recommended oil, Havoline 5W-40. (chuckle) It can be found at Oil Changers for slightly more than $4 a quart! I am sure other oils with the same ratings and other oil filters can be used with no ill effects. See my oil filter page.
I add four quarts of oil and check the level. It is not good to overfill the oil in the car. The oil will be struck by rotating parts in the engine, foam up and get air bubbles. These will reduce the ability of the oil to support the rotating parts of the engine.
I find that the car will take about 4.75 quarts. Start the engine and let it run for a few minutes. Check for leaks at the filter and at the drain plug. Shut off the engine and check the oil level again. This time it will be lower because the oil filter needed to be filled with oil, which happens when you start the engine. The oil light may flash for an instant, indicating low oil pressure as the filter is filled.
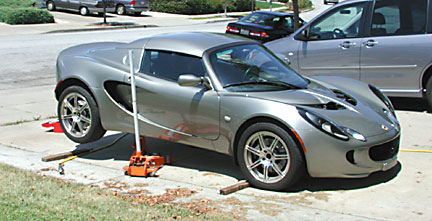
Check your oil level one last time and add sufficient oil to bring the level up to the top mark. You will find that when you next drive your car it will run smoother and have more power. This is in anticipation of the new oil running through the engine. Note below how the car even looks better after an oil change!
Please dispose of your used oil responsibly.

Please let me know if these instructions were useful. Most of my tutorials assume a level of mechanical skill and may be difficult for beginners to follow. For the above tutorial I wanted to provide basic information and help people learn the maintenance skills needed to keep their car running. I will provide more tutorials at this level if this one is helpful.
There is some information missing. For example, what side socket is used to remove the access panel bolts and what size Allen head wrench is needed. Please send me this information and I will add it to the above description. I will also give you credit for the information!
Thanks to EliseTalk id "OppositeLock" for help with the above. Jim_Itin had the following additions:
- Before taking the car out for a drive (the oil must be hot before changing), remove the access panel. This will allow you to start draining the oil much sooner (while it's still hot and the junky stuff is still suspended in the oil). On the other hand, you might not need to remove the access panel before the drive if you've substituted Dzus fasteners (quick release fittings) for the standard hex nuts / allen head fittings.
- Run the car at moderate to aggressive rpms for at least 15 minutes (or more since it's fun). The point is to get the oil FULLY warmed up and the thermostat(s) to the oil cooler(s) open so that the oil in the cooler(s) circulates thru the sump.
- When you've completed the banzai drive around the countryside, and you're draining the old oil, let the sump drain for at least 20 minutes. As long as you can stand it is best -- less old oil left to mingle with the fresh lube is better.
- Before re-installing the sump drain plug, wrap a few turns of Teflon tape around the threads. Not really necessary, but you know the plug will come out the next time without damaging any threads.
- Fill the new filter about 80% full with fresh oil, then thread it back on to the cleaned mount (after lubing the filter's seal, of course). This will eliminate most of the lag required for the oil pump to fill the filter housing (which must happen before oil reaches all those sensitive bearings). I know it's only a few seconds, but a little oil starvation goes a long ways with crankshaft and camshaft bearing surfaces.
You can also change the gear box oil while you are changing the engine oil.