
Replacing the Steering Wheel for Better Grip
Why
Speed Racer is a friend with a Lotus Elise. He provides the following account. He is equipping his Elise for the track and needed to remove the air bag. He replaced the original Federal steering wheel with the steering wheel from the 111R. (The 111R is the European version of the Federal Elise.)
The 111R steering wheel is farther away from the driver and closer to the turn indicator and wiper stalks. You do not have to reach as far to adjust the stalks as they fall readily to hand. The turn indicator stalk is 2 1/8 inches away from the forward portion of the rim of the wheel and the wiper stalk is 1 7/8 inch away.
The profile of the wheel is different and does not include the contouring and texture of the Federal wheel, especially at the 9:00 and 3:00 o'clock positions.
The horn button is in the center instead of at the ends of the two top legs. (No more accidental autocross or track horn soundings!)
The Federal wheel is made by Momo and the 111R version is made by Nardi.
Chris Harris of Auto Car magazine picked the Elise steering wheel as the best ever:
What's the best steering wheel ever?
Now there's a question. The steering wheel is everything. It's the point of contact, the apparatus through which you apply your skill (or lack of) to the machine. How it looks, feels, turns, even the angle at which it protrudes, is the singlemost important aspect of interior design. It doesn't matter who climbs into a car they haven't sat in before - Wurzel Gummidge or Damon Hill (or are they one and the same these days?) - The Procedure has, and always will be, the same: settle, cast a few glances around the place, prod a button with minimal interest, then concentrate and grin before flexing those fingers and clasping the round thing. And resist the temptation to make brum-brum noises.
See the original editorial for the complete text.
Ordering the New 111R Steering Wheel

Note Item 23 is the Federal steering wheel assembly. It is replaced by a combination of items but collected together as Item 1. I ordered part number A117H0047J, which includes a black tooled leather crash pad. There are red, black, cranberry, harvest brown, ingleton biscuit and grey crash pads available.
Be sure and order item 5, the horn contact plate. The Federal contact ring is different from the 111R contact plate. The turn signal cancellation is also implemented by an eccentric on the contact plate. The plastic surround for the column will not fit and those parts should be ordered as well.
Lotus also makes a removable steering wheel with the Lotus logo.
How to Remove the Federal Wheel:
Follow the directions in the Service Manual, page 4 of Section HG. The air bag is an explosive device and must be removed according to the instructions included in Section WD.
1. remove the column shrouds. The top shroud has two screws and the bottom has four.
2. disconnect the battery and make sure it does not touch the terminal.
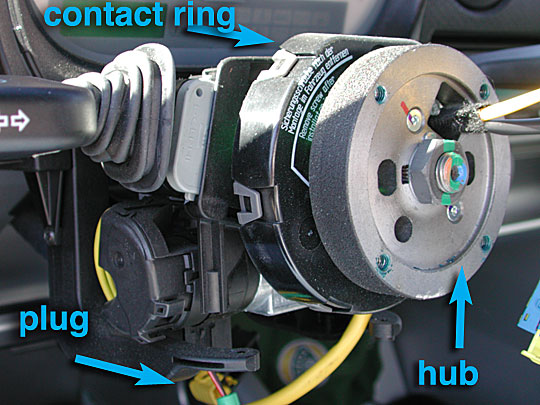
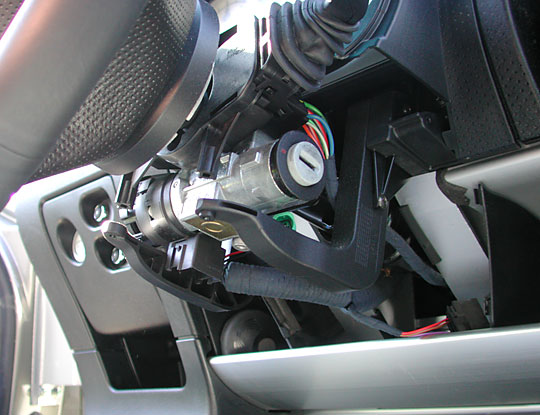
3. remove the yellow plug connector at the base of the steering column. Note the shorting contacts that prevent the air bag from detonating. (The steering wheel has already been removed in the above picture for clarity.)
4. remove the two Allen head bolts from the rim of the hub of the steering wheel. They are located 180 degrees apart and are just on the other side of the spokes from the driver.
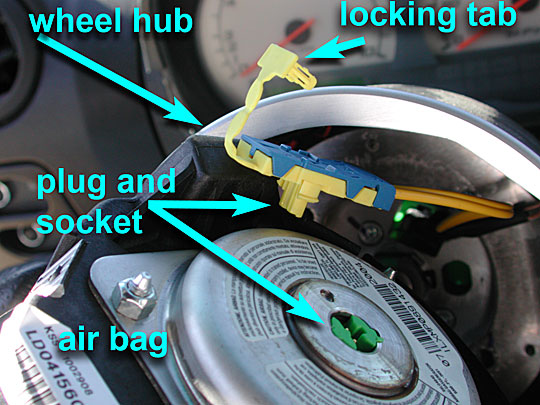
5. pull the air bag module from the hub of the steering wheel and disconnect the wire from the air bag module. The locking tab must be removed first before the plug is pulled.
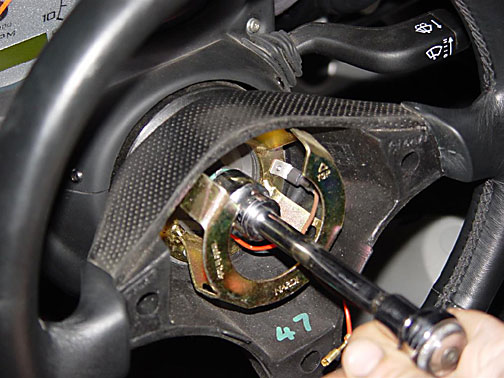
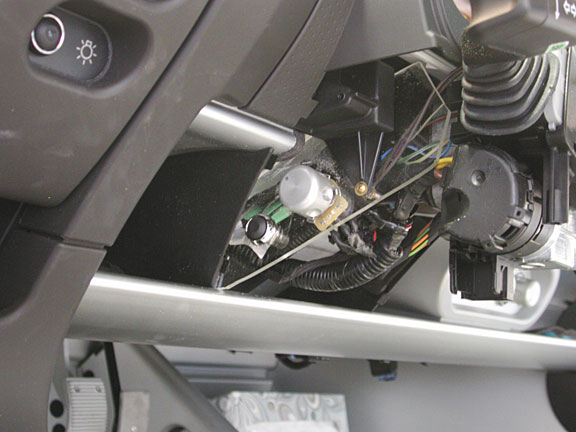
The picture above shows the hub of the car and the instruments above it. The air bag module has been tilted out and down to provide access to the plug at the rear of the module.
6. handle the air bag module carefully, according to the instructions in section WD of the service manual.
7. remove the four Allen head mounting bolts from the hub of the wheel and remove the wheel. The Allen wrench is in the last bolt and the other three have already been removed.
8. unplug the horn
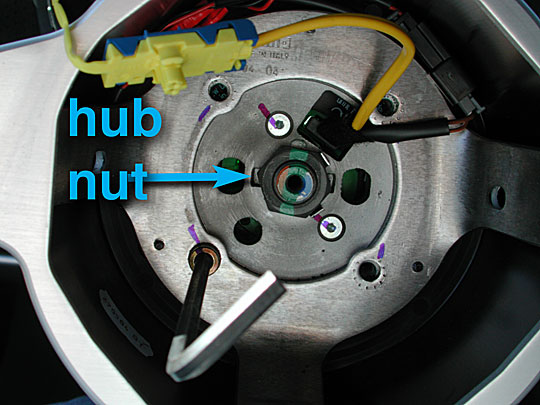
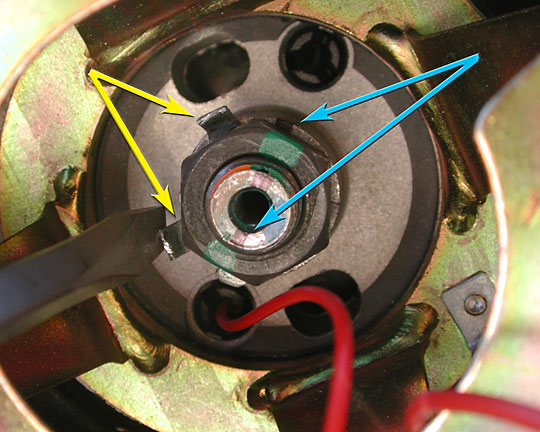
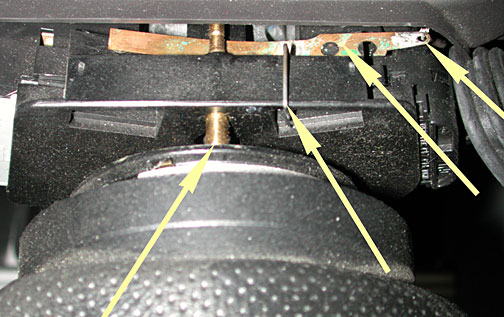
9. (refer to the picture below for step 14) mark the center shaft straight up and down, with the front tires pointing straight ahead. Put a mark on the center splined shaft of the steering column, seen at the bottom blue arrow. Note the nut that is currently holding on the steering wheel hub, with the green marks. Do not use this as a reference as it will be turning. Also mark the steering shaft, as shown by the top blue mark as this will help you later if you decide to reinstall the Federal steering wheel at a later date.
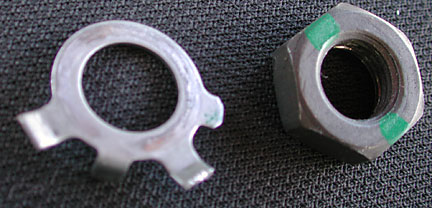
10. press down the locking tabs on the center nut holding the hub to the steering shaft.
11. remove the hub nut as shown above. The steering wheel will turn until the column lock clicks in. I held the hub from turning to minimize the pressure on the locking mechanism when removing the nut. The center mark will turn and the front wheels of the car will no longer be pointing straight ahead. (The picture below at step 14 shows the 111R wheel being installed and tightened. The removal looks similar except the Federal hub is being removed.)
12. using a steering wheel puller, pull on the hub. Be careful as it does not take much tension to release. The hub is spring loaded and will pop off. Be prepared to catch it. The contact ring will come away as well. The contact ring provides continuity for the air bag and horn electrical circuits. Should you want to replace it at a later time, there is a special procedure for aligning it. It will only rotate five turns and so must be centered when re-installed.
Installing the New 111R Steering Wheel
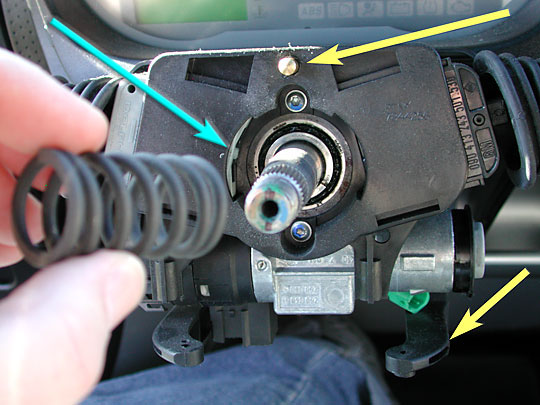
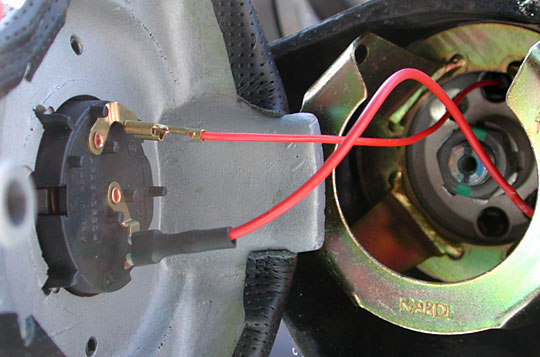
Note the horn contact pointed to by the upper yellow arrow. This is a spring loaded contact that touches a contact ring on the back side of the steering wheel hub. It is not used in the Federal version.
The bottom yellow arrow points to the plastic structure that supports the plastic finishing panels that hide the internal parts of the steering column.
The blue arrow points to the tip of the turn indicator pin. The pin will extend when the turn indicator is activated and will cause the indicator to be reset when an eccentric on the horn contact ring trips it.
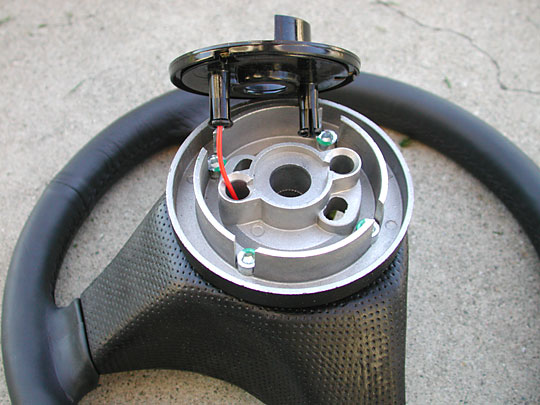
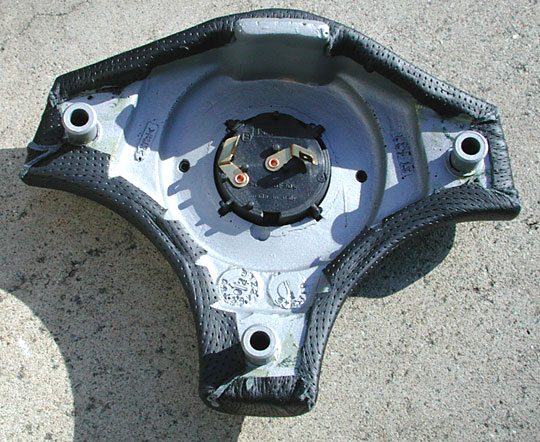
13. Put the new horn contact ring in the hub of the new steering wheel. Note how the horn wire goes into the hole at the bottom arm of the steering wheel. The pins on the contact plate will got into the two round holes. Note especially the turn indicator cancellation eccentric at the top of the picture. This is a part of the black plastic that extends above the hub and is a partial circle. It must be on the left side of the steering wheel, directly across from the turn indicator stalk.
14. put the wheel onto the splines and press the steering wheel in order to compress the spring. Remember the alignment marks you placed on the center shaft? Rotate the wheel until the alignment mark is pointing up and down and check to see if the tires are pointed straight ahead as well. Pull the wheel off again and center the wheel with the center arm pointing as close to straight down as possible. The steering wheel should look like you want it to when you are driving straight ahead.
Unfortunately the splines did not match on my two wheels and so the second wheel did not point exactly straight ahead no matter which spline I picked. One was a little to far left and the other a bit too far right. The wheel was close but not exact.
The last small adjustment will have to be made by slightly loosening one tie rod and slightly tightening the other side by the same amount. This should be done at the same time as a front end alignment as the car is very sensitive to toe settings.
credit Theo
15. tighten the nut on the steering wheel.
16. crimp in the tabs that prevent the nut from loosening as shown in the picture above for step 14. Note the yellow arrows.
17. connect the horn wires to the terminals in the horn button.
18. press the center hub pad and horn button onto the steering wheel center. The three T nipples need to fit into the rubber holes at the three legs of the wheel hub.
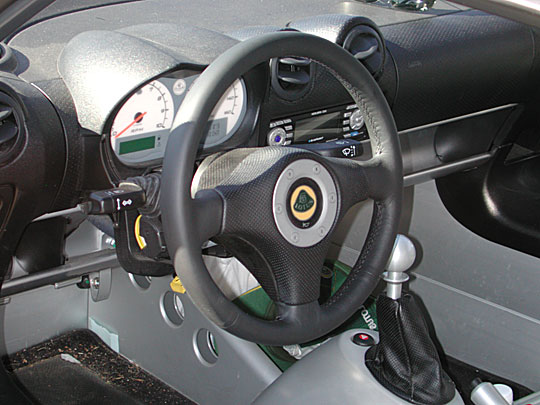
You now have a steering wheel that looks like the first picture.
Replacing the Plastic Surround
Note in the picture above that the plastic finishing panels, the plastic that hides and surrouunds the hub mechanicals, no longer fits. It extends beyond the what is needed with the 111R steering wheel. The mounting tab at the bottom is about where the steering wheel hub ends.
A bit of American ingenuity can be used to trim the existing panel to fit. Or 111R panels can be purchased and should fit, however other items may have changed. I decided to leave the area open.
There are some plastic arms that provide mounting points for the plastic panels. These are held on with two screws and are easily removed. For those with long legs, this may provide some additional knee space.

Dimmer Switch
The dimmer switch and trip odometer reset can be mounted on one of the plastic arms. Since I removed the arms, I tie wrapped the switch to the wiring harness. It might also be possible to drill the arm or drill the support for the arm to mount the switch.
Horn Wiring
The wiring harness is different for the Federal Elise and the 111R version. The horn in the Federal version uses the same harness as the air bag and enters the wheel using a clock spring contact wire component. The 111R horn contact uses a conventional spring loaded pin and this touches a circular ring in the hub of the wheel. (See many pictures above.)
I did not take the time to find out if the pin were connected to the wiring harness through a slide contact inside the turn and wiper stalk assembly. (The spring loaded pin may actually be connected to one of the turn indicator or wiper plugs. I did not explore this as a solution.)
I originally connected a wire to the end of the contact pin with an E clip. This was a poor solution.
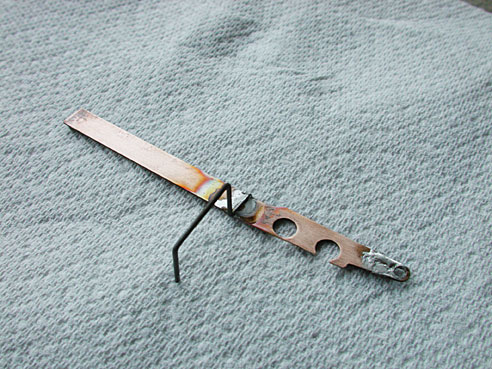
I fabricated a contact using a pinball leaf switch. I silver soldered, stronger than regular zinc solder used in electrical work, a retaining hook onto the metal. This conveniently hooks over the turn and wiper stalk assembly and holds the contact, with a slight bow in it, under the horn contact pin.
More Pretty Pieces
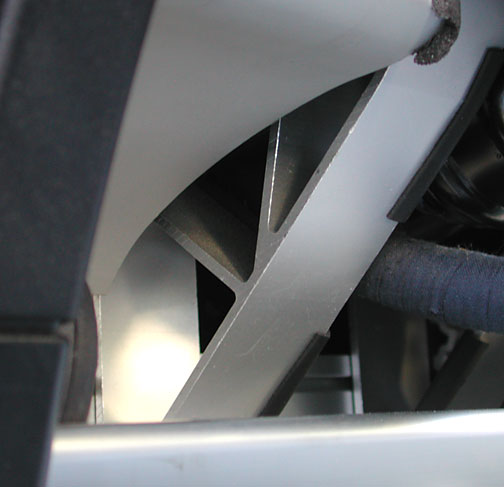
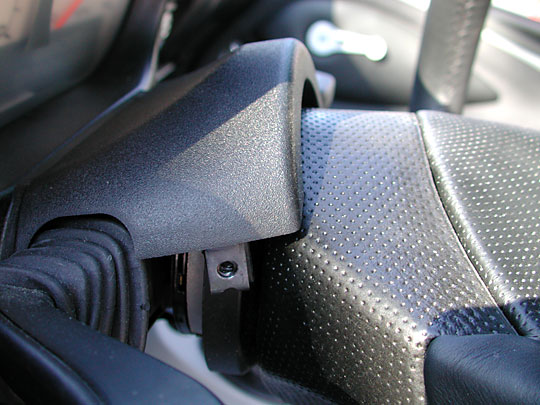
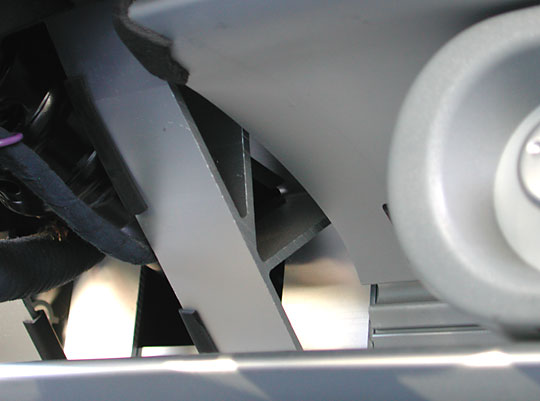
There are a couple of plastic finish pieces that block off the package shelf as it extends under the steering column. Removing these shows some more beautiful extrusions. The above is the left side.
Alternative Button and Traction Control Knob Panel
After doing a similar install on my Exige, I needed a better place to mount the traction control knob and dimmer switch. I fabricated a clear plastic panel, and bolted it onto the original steering column shroud frame. The forward portion of the panel hooks into the package tray which prevents rotation.