
Stereo Upgrade
The original stereo included in the non-touring Exige for 2008 was terrible. The Alpine head unit and speakers were a significant downgrade from the Blaupunkt that came with my Elise, also non-touring. I was even unable to listen to the sounds when driving around town, the system was so bad.
After a great deal of research, I decided to replace the existing components with the following:
- JVC Arsenal KD-AHD39 head unit
- JVC KSPD100 iPod adaptor
- Alpine PDX-4.100 amplifier (4 channels each at 100 watts)
- JL Audio TR650-CSi component speakers for the rear, deleting the tweeters
- JL Audio VR525-CSi component speakers for the front
- Jim Clayton speaker adaptor rings (See LotusTalk for contact information)
I was unwilling to give up space inside the cabin for either a subwoofer or to mount the amplifier. My goal was to install the amplifier under the dash. Upon further exploration, I found that by relocating a couple of relays, the amplifier will fit under the dash. However space was so constrained and my body did not contort sufficiently to allow me easy access and I abandoned the effort. I did install the amplifier inside the dash.
The rear speakers are close to acting as subwoofers. It may have worked better to install actual six inch subwoofers in the back but I am not knowledgeable enough to insure they would work well.
I want to thank Westrock, apk919, and ChrisH, all of LotusTalk fame, for information that helped with the installation.

Rear Speakers
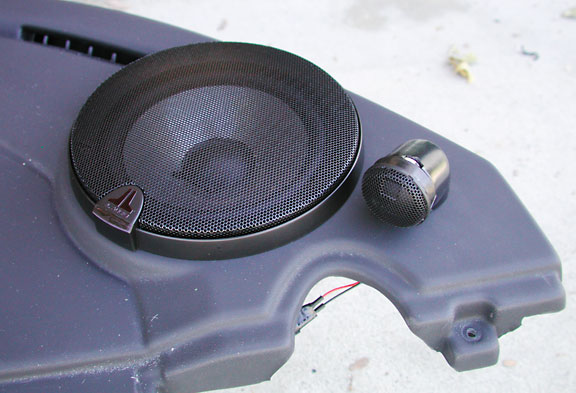
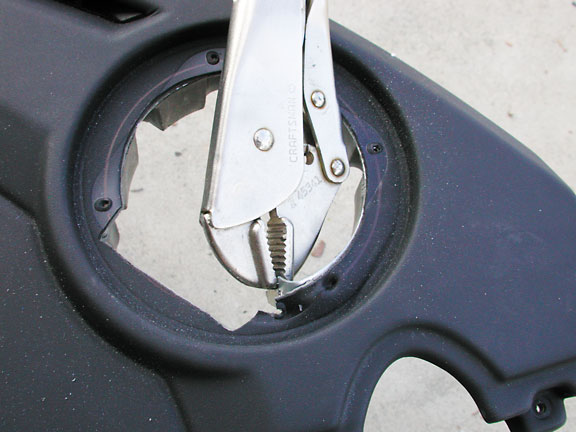
I removed the rear speakers. The hole in the pods was too small to install the six inch JL Audio speakers so I removed the pods as well. The opening in the pod was expanded to fit the larger speakers and the clips from the new speakers were used for mounting. The tweeters were discarded as I expected the front tweeters were sufficient and rear tweeters might degrade the sound stage.
The original foam damping inside the enclosure was insufficient and did not prevent air from escaping around the edges. The volume behind the speakers is large, much larger than expected, so I packed the edges and openings with foam but left a large portion of the volume empty as if a speaker enclosure.
The original fasteners are one time use and need to be replaced. The pods were reinstalled with foam weather stripping around the edges.
Speaker wire, 16 gauge, was run to the center of the back shelf and into a wire guide. The wire guide followed the center spine of the car, under the shift console, and up under the dash. Interestingly enough, it was more difficult to get from under the dash into the dash than it was to get power into the dash! The wires needed to be routed to the sills, around the side of the dash, and into the dash area itself.
Front Speakers
Jim Clayton of Lotus Talk, provides some plastic rings, 5.25 inches in diameter and about 0.25 tall, to enable 5.25 inch speakers to fit easily in the dash. These have the added benefit of adding some height to the opening, allowing deeper speakers to fit.
The hole in the dash is reinforced with a metal plate, surrounding the speaker. The hole needs to be enlarged only slightly to fit the 5.25 inch speakers so the metal needs to be removed.
I created small stands for the tweeters out of 1.25 poplar. I finished the wood with successive coats of black paint and finished with a coat of Polyurethane. I drilled one hole in the dash to mount the tweeter stand and one hole to allow the wiring to pass through the dash.
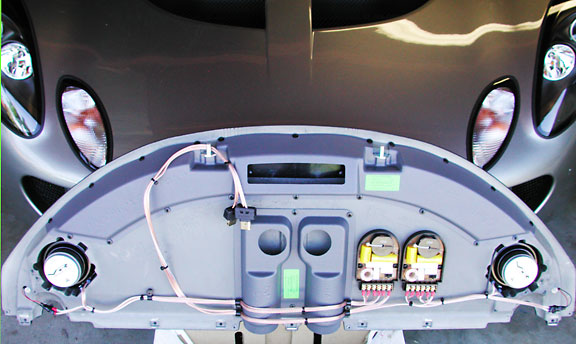
The component speakers come with large crossovers and these were mounted to the bottom of the dash. (See picture at top of the page.) All the wiring for the component speakers was also mounted to the underside of the dash. This allowed the dash to be removed and replaced as a single component with only two wiring connections required.
I put my wife to work, blacking out the logos on the speakers. I do not like to advertise. She did an exceptional job.
Power
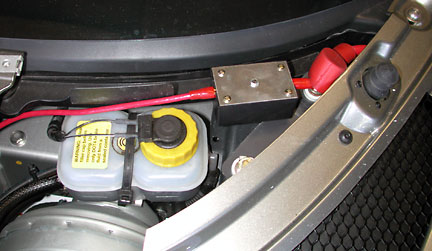
The Exige has a battery jump station under the driver's side access panel. This allows the car to be jumped and the doors opened, should the battery become discharged. A large cable runs from the battery to this station. Since I only needed to go four feet, I decided to run 8 gauge wire from the jumping station to the amplifier. An inline fuse is required but I was unwilling to use the bling ATU or other large fuse, or worse, the expansive blue and red neon fuse holders with digital voltage read outs. These go against the light weight concept of the Lotus. I purchased a regular ATC fuse holder, small hobby box, and 8 gauge terminals and assembled my own inline fuse.

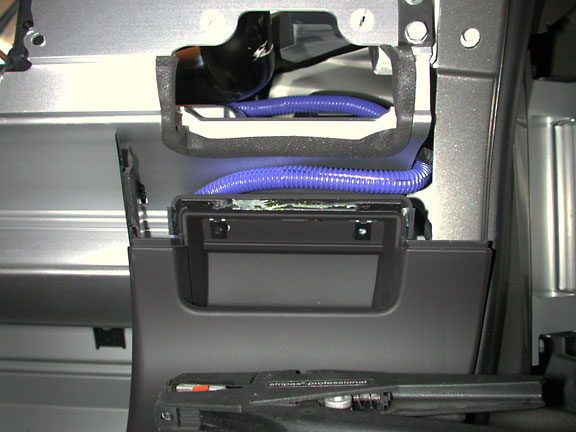
The fuse fits into a hobby box and mounts under the access panel.
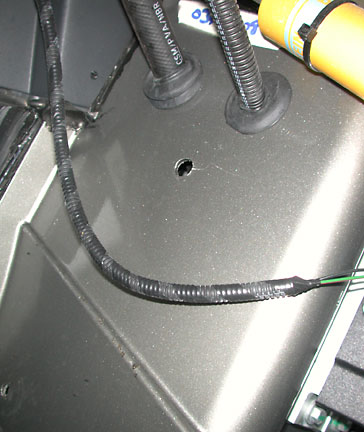
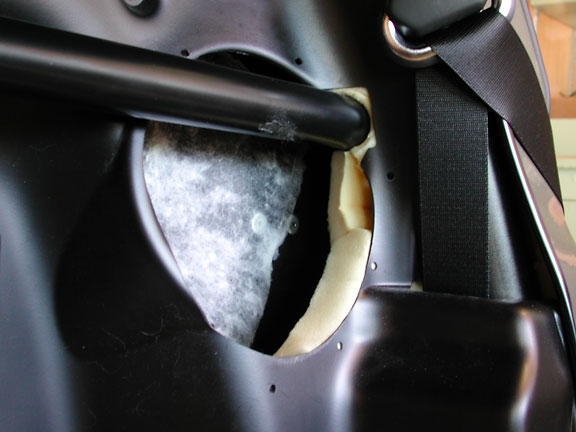
Routing of the power wire is critical, avoiding areas where there may be moving parts, and keeping the route short. I found a hole behind the wheel well liner that allows access to the top dash area. The wire is routed to the passenger side wheel well, about 10:00 o'clock position relative to the wheel and tire, and into the dash. The inline fuse is mounted as close to the battery jump station as possible.

Amplifier
While I preferred to mount the amplifier under the dash, I was just not flexible or strong enough to do so. I mounted the amplifier where the air bag and air bag sensor were originally mounted. (Air bags are a safety device and should not be removed without sufficient thought.) The air bag sensor is mounted on a raised platform which provides a base for a sheet of aluminium that will act as a platform for the amplifier. The studs for the airbag sensor require spacers for the amplifier. The Alpine amplifier required blind fasteners and so studs were added to the sheet and the amplifier fitted down onto them. The original air bag sensor was not removed and was fastened to one of the original bolts that mounted the passenger side air bag frame.
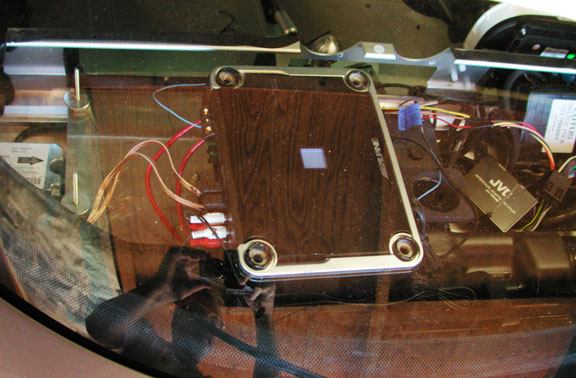
Note the location of the air bag sensor at the far left (the arrow pointing right), the amplifier wired and ready to slide down over the mounting screws in the added plate, and the JVC box that contains the iPod adaptor and cable.
Head Unit
The JVC head unit comes with HD radio and so does not need a conversion box. The Apple iPod adaptor was external and was zip tied to a portion of the dash wiring. I used the Metra 70-1784 wiring harness to go from the Lotus stereo connector to the JVC connector, allowing easy removal of the head unit. As noted in the wiring image, the 12VDC and switched ignition wires are reverse in the harness for the Alpine units.
The JVC head unit metal mounting sleeve replaces the Alpine sleeve. The blue wire for the remote turn on is fed to the amplifier. I did not connect any of the head unit speaker wires to the car as I did not expect to use them.
After using the JVC for a couple of days, I was impressed. The user interface is well done, with few modes and sufficient access to most features. It has a volume knob! There are three pre-amp outputs, the source can be leveled, gain set for the amplifier, and there is a five band equalizer. Best of all, most of the face is black and the unit does not have the bling most often associated with modern head units.
Sound
The sound is amazing, at least to these old ears. Unfortunately because of my advanced age and resulting hearing loss, I am unable to assess if this system is ideal. It is certainly loud as at high volume I am unable to hear the engine. I was surprised at how my shift points are often selected based on engine sound and I needed to rely on the tachometer more when playing music. The sound stage is greatly improved as now I can hear stereo! I worried the tweeters might be too bright but the combination of good speakers, a great crossover, and my hearing loss at the high end, all combine to provide a wonderful sound.
I have not finished adjusting the cross overs. I am able to fade the back and the front speakers, effectively adjusting the level of the subwoofers. I also have the gains both in the amplifier and the head unit to adjust and I have crossovers in the front of the amplifier to adjust. The system will never produce the thumping bass but then that was not one of my objectives.
See also: