
How to Inspect and Repair Gears
Because of this article, I have received numerous inquiries about fixing the Spilhaus Space Clock. I no longer fix these clocks. However I am happy to describe the work and even consult with a clock repair person about your clock. Repairing the clock does not take much knowledge and requires only a moderate understanding of mechanical things. No special tools are required beyond a screwdriver, hex wrenches, and some dish soap to clean the insides.
I spent several years looking for a machinist willing to make the replacement gears. The gears are made out of Delrin, a more stable plastic, and will not shrink. Delrin is a more permanent fix. The gears should not be made out of metal as they will gall the soft plastic teeth on the outside of the discs. Some clocks have metal gears, sometimes one gear and others with all metal gears. While the metal gears might wear the plastic on the discs faster, the wear is negligible.
How to Examine Your Gears
The clock may appear to be working. The small 12 hour dial will keep the correct time and the other display dials may continue to turn. Unless you keep accurate track of the moon and sun position, the tides and the date, you will not notice that anything is amiss. With a cracked gear, all the functions will continue to turn but will be rotating at a slower rate, adding errors to the display. The gap in the gear, where the split occurs, will act like an extra tooth as the display discs rotate.
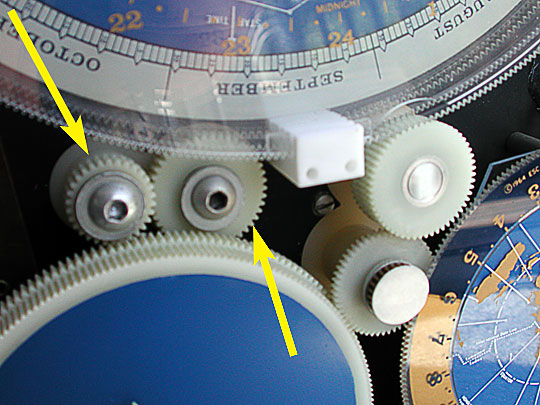
Unfortunately it is very common for the gears to split. Eight out of ten clocks will have at least two split gears. The left arrow points to the most common position of split gears. Occasionally you will find the next gear over, the yellow arrow on the right, will also suffer from a split. More rare are splits on the two sets of gears on the right. I have seen one unfortunate clock that has all the gears split or starting to split.
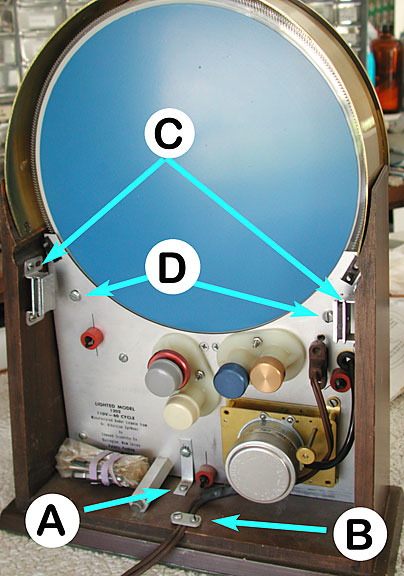
In order to check the gears without removing the works, try the following. Examine the gears by looking carefully from the front, at the bottom left part of the big dial, around the number 22. You are looking in the main dial, just above the 12 hour clock. Look down into the works and look for the small gears.
Turn the blue knob or the brass metal knob used to set the time and watch the gears rotate. The split will look almost like a missing tooth (see below). You can turn the blue knob to to check the gears to the right of the small gears. Again, see the yellow arrows above for the position of the larger gears. You can rotate the gears in order to examine them completely.
It will not be possible to see all the cracks or even the beginning of a split gear. The only way to be certain that the gears are whole is to remove the works from the case and examine the individual gears with a magnifying glass. The start of a split appears as a hairline crack, usually radiating outwards and starting near the metal bushing.
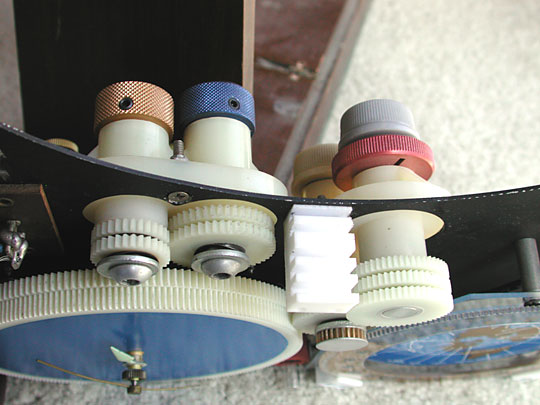
To examine the gears more carefully, begin by taking the works out of the case. See the instructions above for the removal. Once the works are removed, the gears will be visible as shown below. Carefully examine the gears for cracks or the starting of a split. You will need a magnifying glass to see if the plastic is solid or not.
This is the view as if you are looking down through the main display dial, at the 22 hour position. The dials have been removed so you can see the gears more clearly.
Replacement Parts
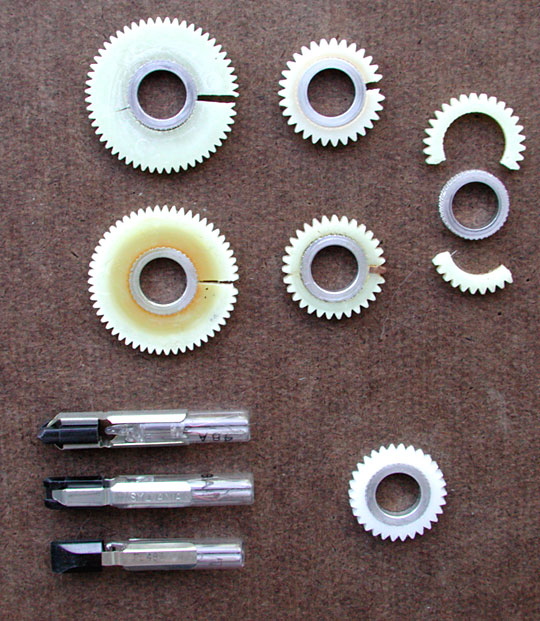
Note the five broken gears above. The right most gear has cracked completely and the parts no longer fit on the bushing. Look carefully at the small gear in the middle. It has been repaired with a small wooden tooth. Unfortunately this changes the gear ratio and the clock will not keep track of the time correctly.
The gear on the bottom is a replacement made from Delrin and includes the center metal bushing. Metal bushings can also be supplied if they are missing.
Replacement gears can be purchased from Steve Cotton of Micro Precision Parts Manufacturing. You can contact him through the website or by phone, (250) 752 5401. He is located in Qualicum Beach BC on Vancouver Island in Canada.
The original gears were made out of Nylon. As the plasticizer evaporated, the gear material shrinks. The Nylon can only shrink so much because of the metal bushing and eventually cracks. Some of the cracks are difficult to see without careful examination. Sometimes a flap is across the gap and the gear appears complete when it is not. Most often the small gears attached to the gold knob crack but I have found every gear is susceptible.
The small and large gears are concentric and have a friction clutch between them. The friction material can be cleaned and reused. A thin rubber, like that used to provide additional grip for opening jars in the kitchen, can be used as a replacement if the original clutch cannot be used.