A Game with Personality
Happy-Go-Lucky (Gottlieb 1951)
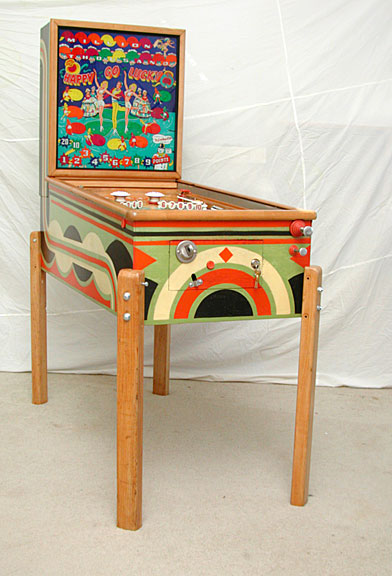
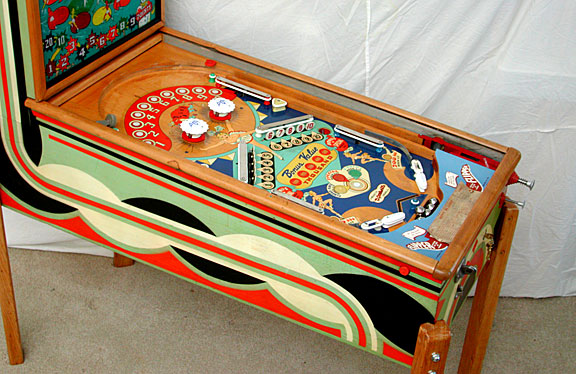
Happy-Go-Lucky was made by Gottlieb and released in 1951. It is a wood rail with an ice skating theme. It has two pop bumpers, a bunch of roll overs, and a gate that rises up between the flippers. This game was purchased what I first started collecting, in a package deal with two other games. I was not particularly interested in it and wood rail games were not special yet. 20 years ago, most games sold for $175-$300. As us ol’ timers like to say, “Them were the good ol’ days.”
Happy-Go-Lucky languished in my collection for many years, but eventually people discovered the game and started making generous offers. My personality prevents me from selling a game that has not been played! My intention was to fix up each game in my collection, play it for a while, let the “new” wear off, and then sell it. All offers for Happy-Go-Lucky were declined in anticipation of playing it one day.
Recently when hosting one of my favorite clients during a visit at the Sands Mechanical Museum, he happened to notice Happy-Go-Lucky sitting in a corner. He has a special appreciation for the older woodrails and expressed an interest in it. He persisted and made a fair offer and Happy-Go-Lucky became part of the Eric Levinson Collection.
Choosing a Restoration Person
The game owner should carefully select the person responsible for the restoration. The client’s expectations need to match the style of work performed by the restoration person. Restoration specialists have different skills and enjoy doing different kinds of work, and as a result their restorations differ. Eric picked me because he knows I do the type of restorations he wants. For example, some collectors just want the game to work. They want the game shopped and then they play it happily. Other collectors want the game to be better than new. They want new, painted cabinets, new-old-stock playfields and plastics, new backglasses, and new chrome. The game needs to look better than new, a real showcase. There are many variations and each has a value to a particular client. There is no right or wrong.
Here at the Museum we do restorations that many will consider obsessive, and rightfully so. The goal is to make the game look like it has been on location for six months. It has been played and enjoyed and as a result, it will experience some wear. The original patina and look is preserved, even in areas requiring repairs. The game should look its age. Protection is added to prevent any further wear of the graphics but again, the original patina is retained. All mechanical assemblies are disassembled, cleaned completely, and assembled in order to insure they work as originally designed. While the patina on the outside of the game is desirable, this is not true for the insides of the game! Who wants to see grungy, old, mechanical bits? The games are to be played and enjoyed for many more years but they should look their age, and look like people have enjoyed them in the past.
There was an episode of Antiques Roadshow, where the unhappy owner was just informed that the old writing desk was worth $5,000. Had he not refinished it and retained the original, nicked, and worn finish, the desk would have been worth $50,000! Pinball machines are not yet fine furniture, but the day will come when people will value a game with the original finish.
The initial personality of this game is one of age, a 56 year old man or woman with some worn spots. This game was going to be a challenge because Eric wants it to be perfect. The game will be cleaned and restored, missing paint replaced, but in a way that matches the original patina of the game. Read on!
Condition
Mechanically the game was complete. Other than a couple of interesting challenges, the mechanical restoration was straight forward. Everything metal, every nut, bolt, and lever are removed from the game. All parts are cleaned using a glass bead blaster or ultrasonic cleaner. Final assembly insures that each mechanism operates just the way it was designed. The mechanical effort takes about half the time required to restore a game.
The real challenge was going to be the cosmetic restoration because the playfield, cabinet, and backglass all needed some attention. The best restoration is most easily accomplished when the cosmetics are already in great condition. This game however needed more than just a cleaning. It needed some tender, loving care. Speaking about tender, loving care, here comes my wife! For the next bit of personality, this restoration was a shared effort.
My Wife
Please indulge me for a minute while I explain about my wonderful, patient wife, Lynne. I met her when she was working on her mechanical engineering degree, over twenty years ago. She figured out I was a bit different even then but later married me anyway. Our careers were opposites with her working on real mechanical things and me spending over 30 years in computer software. Seven years ago, I left the high tech world to work on restorations full time and Lynne left her mechanical engineering job to focus on creating websites, a software endeavor. Basically we traded places!
Occasionally I ask her for help. She was trained as a mechanical engineer so she should be good at understanding and fixing the mechanical things found in our games. Happily she cleans parts quickly and carefully and is an expert when using the bead blaster. But that is not where her real skill is. One day I asked for help when touching up colors on a cabinet. Not only did she match the color exactly, but she also painted it on perfectly, flat and smooth! You literally could not tell where the original paint ended and her paint started. I am good but she is better!
Not only that, but she likes doing this kind of work! What a find! She is responsible for touching up the cosmetics and cleaning mechanical stuff. New techniquesa and assembling things is my responsibility. We love working side-by-side with each other! And now she understands why we have games awaiting restoration, filling our dining room and entryway!
Cabinet
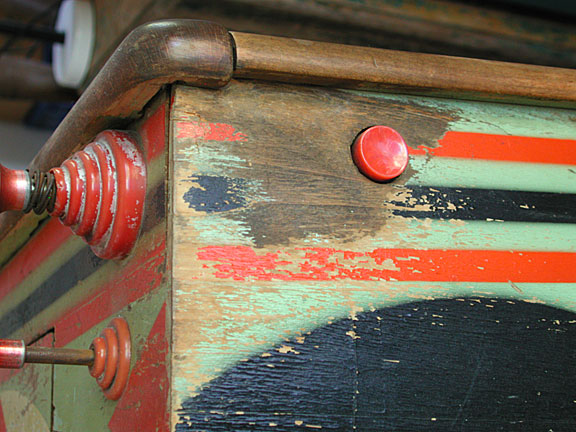
Lynne started on the cabinet. The wear around the flipper buttons was extreme, not only wearing away the paint and staining the wood with sweat, but even wearing away the underlying wood. The cabinet was nicked and scratched all over. First the cabient was cleaned using a cleanser. Comet has a slight abrasive quality and quickly removes any oxidized paint. The original paint colors shine through but care must be taken to not scrub too hard, resulting in removing some of the good paint. The cleanser must be removed completely to prevent bleaching. Cleaning first makes touching up the missing paint easier. There is nothing worse than touching up paint on a faded cabinet, matching the faded color, only to wax the cabinet later and bring out the original color. Now the touch up looks faded! Ask us how we know! After cleaning, she started matching and painting.
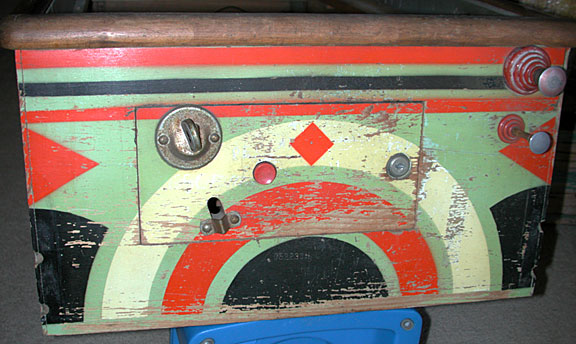
The front of the cabinet was wet at some time and the grain on the wood was raised. Paint was flaking off. Just like with a backglass, the existing paint was stabilized with a thin coat of clear polyurethane. Lynne could then work her magic on the front without further loss of paint.
On one side of the head, someone had painted a stripe of green paint. It looked like house paint, was poorly done, and the color did not match. The extra paint can usually be removed by using one of the many solvents. The solvents are tried in a specific order, from least effective to most, in the hopes of preserving the original paint underneath. Starting with water, nothing happened, probably because no one paints on cabinets with watercolors. In succession additional solvents are tried, including dish soap and water, alcohol, mineral spirits, and naphtha. MEK (Methyl Ethyl Ketone or Acetone are to be used only as a last resort as they will take off original paint easily. Just before trying mineral spirits, some Goof Off was tried because the paint looked like it was Latex house paint. What a miracle! The paint came right off and left the original unaffected. The original paint was perfect. What was the previous owner was thinking? Perhaps they wanted to test their color matching skills!
The wood rails were worn down to the wood and stained at the front with sweat and oil from the players’ hands. Was this game really that difficult to play that it caused the players to work up a sweat? Since the rails needed to be refinished near the front of the game, and wanting to keep a balanced restoration, the full length of the rails and the frame around the backglass were also refinished. Rather than sand the wood completely and make the finish perfect, some nicks and discoloration were retained. While this goes against the Antique Roadshow principles, the stains and wear were severe and detracted from the appearance. Occasionally some compromises need to be made. The legs suffered the same indignity and received a new finish.
Playfield
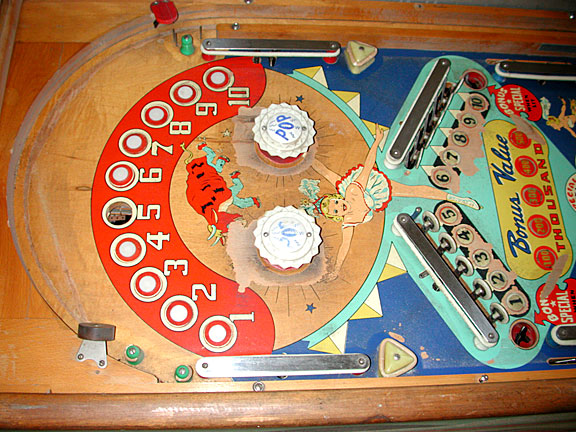
At first look, the playfield looked acceptable with some wear in the expected places. There was wear in front of the capture holes, where the ball bounce when ejected, and there was wear around the pop bumpers. The worst wear was in front of the numbered targets. However upon closer examination there were some worse problems!
Here is some more personality! The operator had inverted the rebound rubber bracket. At first you might think this will not affect the direction of the ball rebound but you would be wrong. Instead of the ball rebounding back along the top of the arch like expected, the ball takes off straight across the open area of the arch! Unfortunately the bracket was upside down for some time and the ball had worn a track into the playfield. The ball track wear was through the clear layer and into the wood. What a disaster!
Repairing the ball track at the top of the arch is very difficult. Repairing another track, especially a straight one, is difficult because your eye is drawn to the line. If the area of the ball track alone is sanded, that part of the playfield will be lower than the rest of the playfield and the ball will tend to stick up near the arch. There is the additional problem of the ball track straight from the rebound rubber which will cause the ball to hop or deviate as it traverses the sanded groove. Getting rid of the ball tracking creates additional problems. Sanding affects the level of the playfield. There is nothing worse than delicately shooting a ball and hoping it will drop down from the arch in the desired area, only to have the ball stay close to the arch and not drop until it gets to the sides. Sanding the arch and getting rid of the ball track needs to be done carefully, merging and fading the sanded area with the rest of the playfield. While sanding, the exsiting art needs to be avoided. Worse, not only had the ball worn through the clear wood finish but the game had been waxed afterwards. Normally this is good, but on an unprotected wood, the wax leaches into the wood, causing additional discoloration!
The surface was sanded level, removing the clear finish right up to the painted area of the playfield. The amount removed was faded into the top area to make sure there was no trough affect. There was still some dirt and wax in the wood so a small amount of diluted bleach was applied to the darkened area. The bleach was applied repeatedly until the stain was no longer noticeable.
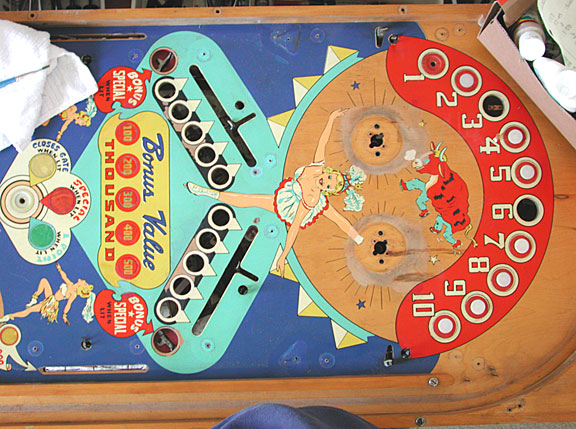
Every single plastic in the game had shrunk as the plasticizer evaporated over the years and needed to be reattached. Some restoration people recommend using Cyanoacrylate or Krazy Glue. This does not work well when there is a significant gap to be filled and if you want more working time. This extra time can be used to make sure the insert is level with the rest of the playfield. Blocks of wood are taped on the ball side of the playfield and then work proceeds on the inserts from the backside. A clear adhesive calk is used, as it remains flexible when dry. It allows the plastic to flex and prevents it from cracking due to the stress from further shrinkage.
You want even more personality? Here is another anecdote. One of the number inserts at the top of the playfield was missing. A long search started as all our sources were contacted for a replacement. None was to be found. Eric even found one that was close but the center hole of the roll over was a different diameter. Work eventually started, in spite of the missing insert, and the bottom board was removed to facilitate the restoring of the mechanisms and relays on the board. What was wedged between the board and the bottom of the cabinet? Yep, the missing insert!
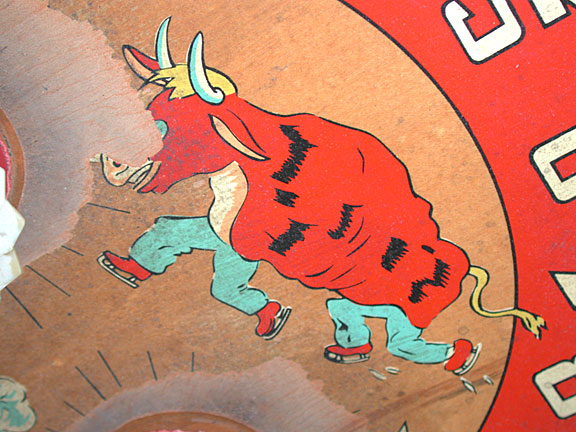
Lynne started working on the painted areas. The face of the bull was missing and we worried about reproducing it accurately. A low-resolution picture of a Happy-Go-Lucky playfield was found on Clay’s website. He did not have any other pictures and did not have a high resolution picture of the one shown on his site. At least there was a close approximation based on the low-resolution image.
The real challenge was the white areas in front of the targets. The area was significantly worn and much paint was missing. Same for the area where the ball lands after it is kicked out of the capture holes. Both areas will require some careful color matching and graphics reproduction. For example, the word "BONUS" in front of the kick out holes was badly worn, but on the left side it was the end of the word and on the right side it was the front of the word. Between the two, an entire word was available as a sample.
Personality shows up again! The kitchen supply stores have a flat plastic piece with several different sized holes in it. Each hole measures a specific amount of uncooked pasta and determines how many people that amount will serve. One of the holes was the perfect size for the circular areas in front of each target, the two person serving size. After many hours of careful work, the circles were finally finished.
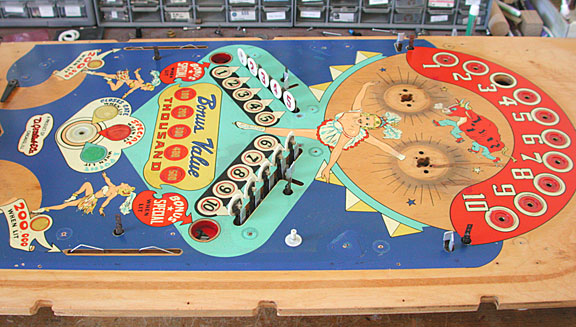
It was time for another difficult decision. The entire playfield needed to be clear coated, not only to protect the touched up areas, but to also preserve the original graphics. Acrylic paint is used to touching up the graphics and is applied very thin. Any ball wear will quickly go through the paint. A coat of clear polyurethane will protect the graphics for many years, no matter how much the game gets played. However in order to insure good adhesion of the clear coat, all dirt, wax, and other contaminants need to be removed. The best way to do this is by using sand paper!
All posts, targets and roll over buttons are removed. The surface of the playfield along with all the inserts is level. It was time to block sand the surface with 1000 grit sandpaper. Personality again as not many people feel comfortable sanding rare artwork with sandpaper. Sanding carries a big risk of removing the paint! Any graphic that is not level will be sanded excessively. All the inserts need to be very level because one small corner sticking up and the original paint disappears.
After sanding, the surface is dull but completely clean. All oxidized paint is removed, making the colors bright, and the surface is clean. The clear coat is applied to the playfield in five thin coats of polyurethane and a final thick coat. A semi-gloss finish is preferred and then the surface is further protected with Johnson’s Paste Wax. Gloss paint is too shiny and does not look right with the rest of the restoration but the gloss of the wax is just about right. This completes the fine finish on the playfield.
I will never be able to look at a Happy-Go-Lucky without thinking about a dentist. Most people do not feel Happy-Go-Lucky after a visit to the dentist! Is this about more personality? You bet. There are supposed to be a couple of thin, blue posts at the top end of the rows of numbered targets. One of the posts was still on the original game and the other was missing. In its place was broken off screw! Getting these out is difficult as they invariable take out a bunch of playfield wood at the same time. The goal is to minimize the damage to the playfield while still removing the broken off metal. Four marks are drawn around the outside of the hole, pointing toward the center. This allows the new post to be located in the identical location after the repair.
Enter the dentist’s drill! The next time you visit your dentist for a check up, ask if he has thrown out his worn drills lately. Often they have a large collection and will happily let you take them away, especially if you tell him or her what they are for. The drill bits are slightly smaller than normal rotary tool (Dremel) accessories. Make a smaller collet by filing a small amount from between the fingers on your smallest collet. Now even you can make that dreaded drilling sound. The offending screw segment was removed using three drill bits. The bits do not drill metal easily and tend to get hot. Make sure you take several breaks while drilling so you do not set your playfield on fire. The resulting hole will be too large for a normal sized screw so fill it with bamboo skewers and a bit of wood glue to hold them in. A pilot hole can be drilled in the location indicated by the previous marks and the marks removed with alcohol.
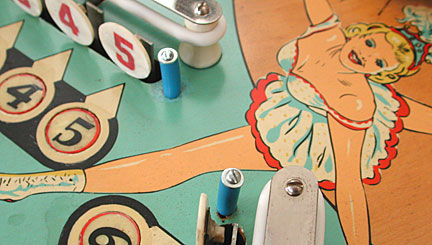
The local electronic surplus store has lots of personality and even some blue insulated wire. There was some coaxial wire of a similar blue color. Taking a six inch segment from a 100 foot roll to the cashier got me a laughed right out of the place, as they refused to take the three cents for half a foot. The next two hours was spent trying to remove the wire mesh shielding, the internal insulation, and the primary wire, all without damaging the outside insulation! You have to be dedicated and patient when you restore a game with personality.
The playfield was repopulated and a new ring set from Pinball Resource added. The sizes were correct so now, upon request, Steve can supply a ring set for this rare game. The rest of the game was assembled by installing the bottom board, the board behind the backglass, and the playfield.
Backglass and Instruction Card
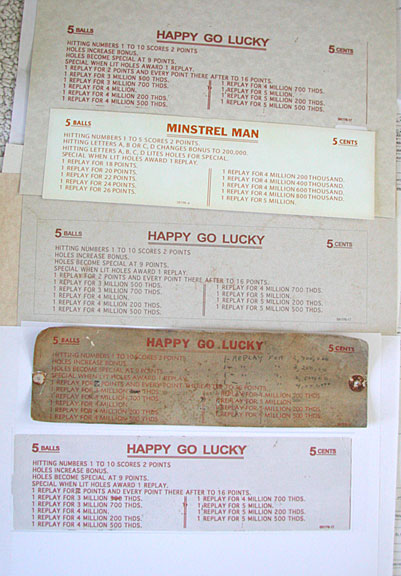
Finding a balance when restoring a game is sometimes difficult. It is often surprising to see a restored game when all the parts are put together for the first time. Some parts might look too new and clash with some parts that are still old. This game was turning out surprisingly well, especially after all my wife’s hard work. The patina was there but the game was starting to look like fine furniture! The backglass was in better than average condition and for a rare game, entirely acceptable. However when placed back on this game, the small problems it had now looked out of place. The instruction card also needed some attention.
The original card was very dirty, almost illegible, and had writing all over it because the operator changed the adjustments and noted the changes on the card. Printing out a new card on white paper was not going to look right either. The card needed to have some artificial patina added.
The original card was scanned into the computer and then the font duplicated. The letters can be duplicated to within pixels of the original. Craft stores sell a bunch of card paper, paper that looked “old”. There are a bunch of new materials used to make scrapbooks and some is perfect for printing instruction cards. Alternatively you can scan in the original and use the original’s dirt to make the card look old when printed. You can modify the image using Photoshop or other picture editing software. Add brightness, patch torn areas, replace operator scribbling, and generally fix up the image. Printing the card then makes it look old and close to the original, just a bit cleaner. Putting in a brand new, all white, instruction card makes the game look odd. The original patina of the cabinet and playfield contrasts dramatically with the pure white and red print of the instruction card. It looks much better to have an older looking card even if the patina is copied from the old card.
During consultation with the owner, it was decided the backglass needed some attention to balance out the restoration. The original backglass had a few flaws in it. There was some missing paint, mostly in non-lighted areas. Nothing big or dramatic but suddenly, because the rest of the restoration looked great, the backglass needed attention to look great as well.
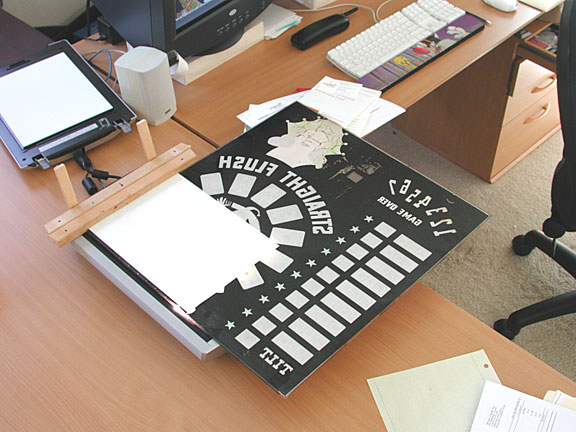
I have reproduced glasses using the computer before and it is labor intensive. The glass is scanned in segments using a flatbed scanner and a wood guide. The segments are stitched together, the missing paint repaired, and colors restored to their original brilliance. The owner then has a couple of choices on how to reproduce the glass. The artwork can be output using ink or dye. Some of the new dyes are UV (ultraviolet light) resistant and will not fade as much as inks will. Regular style inks will start to fade after a couple of years. Some of the problem can be avoided by laminating the artwork with UV resistance plastic. However using regular inks was not an option for this restoration. What else is possible?
Tthe artwork can be output on a transparency with some of the new UV resistant solvents and treated like a translite in a modern pinball machine. In discussing this process with Bill Erdley, another person involved in pinball backglass reproduction, the image can be reversed in the image editing program and printed on self-adhesive vinyl. The material can then be attached to the inside of a plain piece of glass, much like the original paint.
A final alternative is to use the capabilities of the image editing software to create a color mask for each color. These masks can then be used to process silk screens and the screens used to print ink on the glass just like the original process. Some reproductions trace the images in order to produce the screens, but the advantage of scanning over tracing the images is accuracy. Scanning in the images at 300 dots per inch or better results in the artwork being true to within 1/300th of an inch.
To complete the reproduction the black or silver mask on the backside of the original glass is scanned. The mask is also reproduced and applied to the backside of the new backglass.
Now comes a bit of evil personality and there is no good solution. The result is a real character flaw. Special care must be taken with the color reproduction. One thing computers are terrible at is seeing color the same way we do. The scanner sees colors slightly differently when looking at the artwork and displays differently yet again on the monitor and printer. At each step, there is some error in the color. There are many technical reasons for this as I learned as the engineering manger responsible for ColorSync at Apple, their solution to the color prepress problem. The job gave me a new appreciation for how difficult it really is to do color right. The good news is that our eyes and brains adjust to color differences rapidly and unless you see the original and the reproduction side by side, you will not notice how dramatic the problems are. However, for our work we need better than close.
The artwork of Happy-Go-Lucky was scanned in for posterity, in case a copy is ever needed. Since Lynne is so expert at color matching, we touched up the original backglass. This went well until it came time to work on the magenta and blue. She was having difficulty finding a close match to the color at the art store and needed an object with a similar color to take with her. She can hold the colored object up to the many paint colors available and find the closest one. This might be called a personality that sparkles. Lynne wandered around the house and ended up with a coaster and a book on web colors, as these contained a color close to the color in the backglass. It is interesting how some colors absolutely defy reproduction.
For those of you wanting to get serious about matching colors, take a look at an article my stepfather wrote for the National Association of Clock and Watch Collectors. It covers the creation of a color wheel and even includes an example. It can be found on the Sands Mechanical Museum website under miscellaneous: http://www.sandsmuseum.com.
Time for the Smoke Test
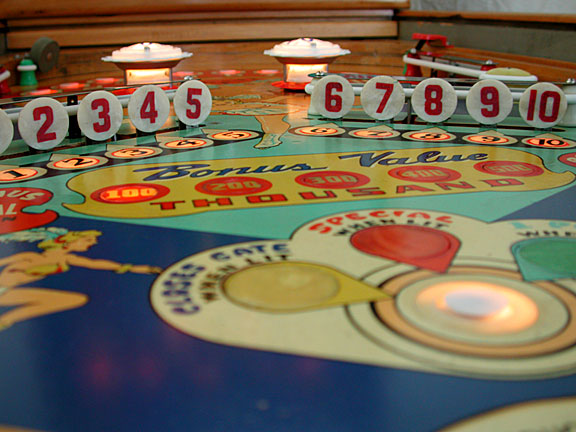
The smoke test is when an electrical device is turned on for the first time and you look for smoke. When you see smoke in computers, it means some of the magic is escaping and the computer will not work, The same is true for British cars with Lucas electronics, and pinball machines.
When you have disassembled an entire game, rebuilt every relay, switch stack, motor and stepper, you wonder how many bugs you will have introduced before you finally turn it on. Perhaps it is better not to touch every part, especially if the game was mostly working before. This game was carefully restored and it will be interesting to see if it works or smokes.
The reset function, the time when you start a game, is almost invariably a problem. This game was no exception but the source was certainly a surpise! A bell clapper was added on the 10,000 stepper. The ringing of the bell prevented the step from completing reliably because the solenoid had to both pull in and ring the bell. Unfortunately it just did not have the energy to do both because of the way it was adjusted. During initialization, the 100,000 unit is reset to a minus one position and it happily waits for the 10,000 stepper to go all the way around. It waited a long time and was not happy! Once adjusted, everything worked correctly.
My punch list was six items long, not bad as restorations go. This machine did not turn out to be as evil as some of them.
The list of things to do, looked like this:
- number eight light does not go out even though the relay trips
- left pop bumper light is too bright
- right kick out shoots the ball past the flippers (Leave it as it is original.)
- install back door and front door locks
- set features to match score card
- ball lift hits the shooter gauge
How lucky can you get! Only two electrical problems existed. Now it is time to play!
One of the areas I need to work on when performing a restoration is the tuning. It is more fun to play than to work on a “new” game. Tuning is setting up the game so it plays well instead of just plays. For example, the contact kickers, or sling shots, or thingies that kick the rubber ring when the ball touches, need to be carefully adjusted. If the kicker is activating multiple times, almost vibrating, the switch gap is too small. The rebound of the rubber ring is sufficient to trigger yet another cycle. Conversely, if the kicker will not activate at all when the ball hits the rubber ring softly, perhaps the switch gap is too large. A gentle push by the slow moving ball will not be sufficient to activate the solenoid. A game is fun to play when all these switch gaps are set correctly, not too close and not too far. Once the adjustements are correct, the game plays with feeling, another personality trait.
Another example of “fun to play” is when the ball lift has a solid feel and does not go clunk when lifting the ball. Rubber limit bumpers provide a solid feel and can be fabricated by cutting short segments of rubber fuel line hose. These are placed on the metal limit brackets.
Another hour was spent tuning things up and then we got down to some serious play. The Museum’s official game tester was called in for some consultation. My father-in-law even got to play. The game was finally deemed finished.
The experience of playing this game is wonderful. I was rewarded with a fun project and the joy of playing a fun game, all for refusing to sell it until it was finished. What is it like to play? Raise the bonus to 500 and shoot the ball into the left capture hole. Remember to avoid the right one! The five fast bangs on the score and the accompanying knocker sound are very satisfying.
This game had a great personality. She turned out better than expected and was a fun date.
Thanks to the following people:
- Eric Levinson for letting me restore his rare game. He is also an exceptional restoration resource.
- Thanks to Pinall Resource and Steve Young for parts, imagine how difficult life would be if he were not around.
- Bill Erdley for backglass reproduction consultation.
- Clay Harrel for pictures, his fabulous website, and thoughts on restoration.
I want to thank my lovely wife for joining me in this new career. I could not do it without her.

You can see before and after pictures of the Happy-Go-Lucky playfield.
