
INstalling a new Radiator in a Seven
Damage
A small compact car backed into my Seven at slow speed, causing no damage to the compact and slight damage to the Seven.
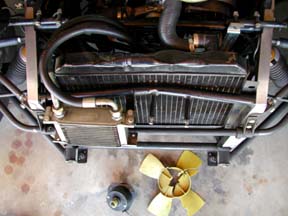
The little yellow propeller gave its life trying to defend my car and lies on the ground shatttered. The nose was literally shattered but regained much of its shape. The top frame rail is bent and the oil cooler is twisted slightly. The radiator was slightly curved but could be reused. The bonnet was scratched where it rode over the nose. The frame of the oil cooler was also bent out of square.
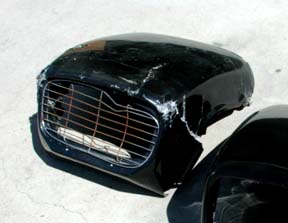
Notice how the cracks radiate from the front to the back on the nose.
Replacement parts were ordered from Rocky Mountain Motor Sports. The original radiator was no longer available and Caterham was now fitting the new, larger aluminium radiator. The new radiator was moved farther forward, into the nose. The old radiator was mounted behind the front frame cross member. Generic replacement fans are available but fans that pull the air through the radiator are up to 30% more efficient.
My car was faster with that little yellow propeller helping pull the car through the air. However the increase in cooling capacity took priority.
Caterham was putting the new radiator into production. The new radiator was ordered from James Whiting in the UK because it was still not available from RMMS. James puts together a nice package, with all the bits needed to make the conversion, including purpose built hoses, clamps and mounting hardware.
However, upon examination, the new radiator interfered with the modifided front suspension in the new mounting position. The radiator sits close to the front sway bar and the fan motor is still farther back.
Mounting the Radiator:
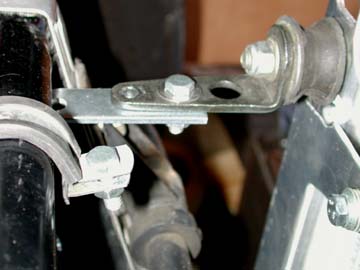
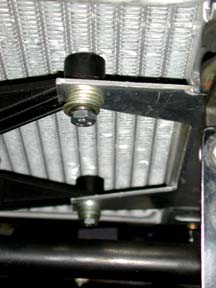
The original rubber isolation mount is used along with the lightened L bracket. However, in order to gain more space and push the radiator further into the nose, the rubber frame clamp, shown here around the frame, was not used. Rather another L bracket was attached to the original radiator mounting holes and the two L brackets, now shaped more like a Z laying on its side, secure the top left of the radiator.
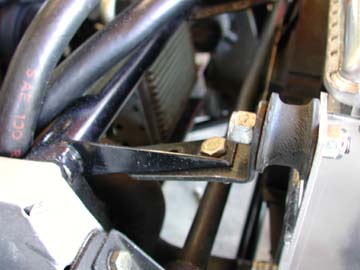
The top right also retained the rubber isolation bobbin and L bracket, but the bracket is now attached to the original oil cooler bracket coming forward off the frame tube. The L bracket was bent slightly to match the angle of the cooler bracket.
This all provides about an half of an inch clearance between the back of the fan and the front of the tubular sway bar.
The fan bolts to tabs on the radiator. The plastic fan legs are threaded on the side closest to the core with brass inserts. The supplied bolts are too long and washers are used to prevent the bolts from extending too far into the radiator core. A better solution is to cut down the lenght, saving the weight of the washers.
The fan sits almost against the core, insuring air is pulled through the core and not around. The radiator mounting tabs are not far enough from the core and need to be bent slightly away from the core so the fan feet can be inserted between the radiator tabs and the core.
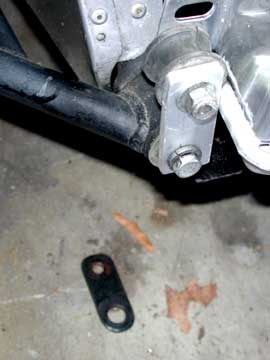
The supplied bottom links were heavy so replacments were fabricated out of aluminium. Actually the bottom links were also longer and prevented the radiator in the new top forward position, from clearing the top of the nose. There are clearance problems with the side of the nose as well, and care must be taken to keep the outside edge of the new link as thin as possible. The outside bottom has been rounded to clear the nose. The original rubber isolation bobbins were retained. The link attaches to the lower A arm forward bolt.
Oil Cooler Mount
The oil cooler really should be mounted in its own air stream and not be forced to cool oil with air already heated by the water radiator. The possible mounting positions are limited. There are no brackets on the front of the new radiator to mount the oil cooler.
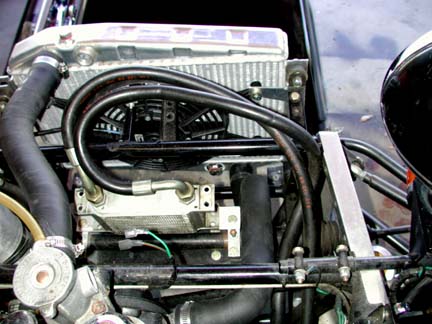
The cooler was mounted on an 1/4 inch strip of aluminium traversing between the steering rack pillow blocks.
Note the water coolant hoses, properly shaped, and weaving past obstructions.
Finished Installation

The radiator core was painted with a thin coat of flat black paint, the better to radiate some of the heat. Notice also the modified suspension mounts and sway bar.
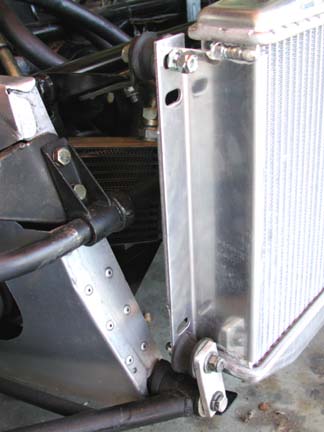
From the side, the radiator tilts slightly forward. There is actually a lot of room in the nose and more of a radiator can be fitted if needed.