
Contents:
Introduction
Play
General Description, Components
How It Works
History
Restoration Part 1
Restoration Part 2
Restoration Part 1
I bought the game from Dennis Dodel from Missouri, on September 4, 1996. It was in exceptional cosmetic condition and was complete. The game was very dirty and was apparently kept in a smoky environment as it was covered with a thick film of tobacco smoke. It did not work, for reasons to become obvious later. Other than electrical problems and the dog missing his tail, it looked like there was nothing obviously broken. The game did show some signs of wear but nothing excessive. One of the rail rollers had stopped rotating and had worn through. The game appeared to be in good condition cosmetically and I had high hopes the restoration would proceed nicely.
I did not start the work until January 1998 and I finished about six months later. Most of the time was spent trying to figure out the light problems, described later, so the actual restoration took less than five months of evening and weekend work.
As I mentioned before, this restoration requires skills across a broad range of disciplines. I needed to understand electronics, including tube amplifiers, photo detection tubes, relays and complex wiring. I had to understand mechanics, including belt driven motors, cams, gears, chains, springs, and solenoids. While I do possess some level of skill in all these areas, I needed to learn more and I relied on several experts help to complete the game. Learning is probably the part I enjoy the most. Also a good restoration tries to retain the original cosmetics, but in order to do so, I wanted to understand the preservation of paint and texture and some of the original manufacturing techniques.
I decided what level of restoration to perform. One of the alternatives was to just get it running again and wash the glass. Another was to remanufacture the game, rebuilding it with all new parts, re-chroming, re-painting, and re-manufacturing serviceable parts. It might be better than new.
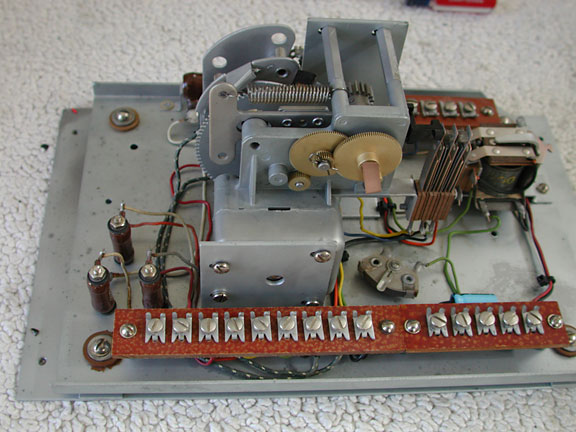
This is the coin counting mechanism found in the gun cabinet. It allows the player to put 25 cents or a dime into two different coin slides and will then keep track of how many games the player will earn as a result. Each game played will rotate the gears, knocking off one credit and resetting the game. The blue capacitor barely visible at the bottom right, is discharged into the relay on the right, to provide a momentary pulse. The duration of the pulse is controlled by the potentiometer, which bleeds some of the current past the relay.
Since I planned on keeping this game, I decided to do what I call a "museum quality restoration". I wanted to make it look like it was ready to be played in 1950. I wanted to preserve it in order to show future generations an exceptional example.
In order to accomplish this I take the entire game apart and clean it completely. I adjust all components so they are like new. If there is ever any doubt on how to proceed, I always err on the side of play. Given a choice between making it look nice or making it play well, I will always choose to make the game play as well. The game needs to play like it did when new, even if that means some things do not work quite as expected. Finally, I try and retain all the original cosmetics, even if they show some age. The game should appear as if it were on location, maintained by an expert operator. That usually means some small wear marks, dings from use, and a patina in the wood indicating age.
Documentation:
The game did not have a manual or schematic. I advertised in GameRoom for documentation and a reader, Chris Friedlander, was kind enough to send them to me. He was also valuable later when I had questions about operation or what the dogÃs tail looked like.
Steve Blankenship later supplied some flyers and an original manual. He even threw in a great lubrication chart.
The United States has a patent office near my home. Another of my hobbies is looking up old patents of various mechanical devices. I was able to find some numbers on the side of the cabinet and found many patents for the Rayolite system. The nice thing about patents is they often include full schematics and the desired rules for the game, along with the designerÃs objectives! The designer frequently describes the desired operation and some of the reasons they included certain features. They often provide a wealth of information.
I also looked for advertisements and flyers in Billboard Magazine and other sources. I was not very successful, as I do not have easy access to these sources.
By module
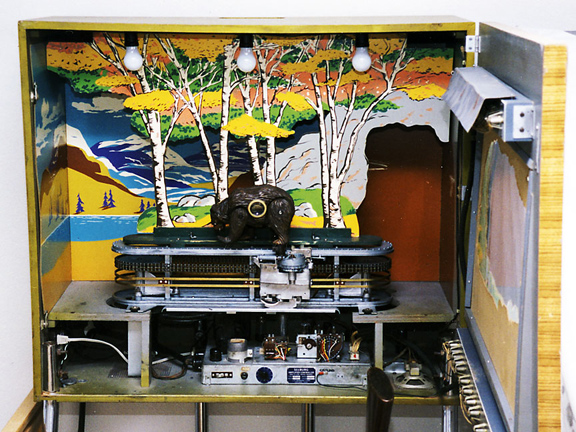
I disassembled the game into its major components, removing them from the cabinet and console. It was going to be easy to work on each module once removed. There were terminal blocks in the cabinet and in the console, so wiring was easily disconnected. The amplifier was removed from the cabinet, providing access to the wiring underneath. I also removed the bear and dog from the track, thinking to keep their fragile cosmetics from harm during the restoration process. The track came out as well.
Cleaning
I use many different methods of cleaning, but the best always seems to be elbow grease combined with water, and either dish soap for fragile pieces or cleanser for dirty metal pieces. I use the normal set of brushes, pads, and paper towels, with my favorite tool being a tooth brush. I also use an ultrasonic cleaner when cleaning parts with hidden, difficult to clean areas, bearings for example. A full assembly can be placed in the cleaner with watch cleaning solution and left to buzz. A later ultrasonic session with rinse solution completes the cleaning. Unless otherwise noted, most cleaning was done using the above methods.
Rebuilding amp
All I needed to do was turn the amplifier over to see why the game no longer worked. There is an old joke about British cars and Lucas electronics. The smoke inside is required to insure correct operation. Once the smoke has escaped, the car no longer runs. It was obvious the smoke had gotten out of this amplifier. There were several wires shorted and black burn marks in several areas. The insulation had deteriorated and allowed several wires to cross. It also appeared the wires to the gun were twisted and shorted, and this might have encouraged several wires in the amplifier to give up their smoke.
Most old electrical devices use electrolytic capacitors in their circuits. These dry out and loose their effectiveness. It is common practice to replace all of them when rebuilding a device. Several advertisers in the GameRoom magazine sell capacitor kits for many jukeboxes. Vern Tisdale was kind enough to use my copy of the schematic to assemble a full set of carefully labeled components and send them to me. He also provided another set of tubes. This made rebuilding the amplifier an easy task.
Several of the old capacitors were the old type, contained in tall metal cylinders or canistors, and located next to the tubes. Replacements are no longer available but the equivalents are very small and easily located inside the amplifier chassis. I just unwired the old ones and left them standing, thus preserving the original amplifier appearance.
The tube circuitry is fairly easy to follow, with one tube amplifying the signal from the bear and the other acting like a switch and triggering the relay. I needed to rewire the chassis and provide some replacement resistors and capacitors.
There are some relays located on top of the amplifier. One reversing relay controls the direction of travel for the bear. There are a couple of other stepping wheels, one counts the number of shots and the other keeps track of the number of hits. These were cleaned and adjusted carefully, as there is a possible race condition and the gaps needed to be precise.
The gun case shows the coin counters, one for each coin slide, at the top. The gun sounder, a solenoid that makes a loud bang, is seen at the top right of the opening. At the bottom of the cabinet is the coin credit unit, which keeps track of the number of games purchased. The wood slides hold the coin box, which has been removed for the purposes of the picture.
Cabinet
I cleaned out the now empty cabinet. The thin film of smoke was easy to remove and seemed to have acted as a preservative! Underneath I found bright and shiny paint and bright metal work. Even the cardboard scenery cleaned up nicely using a damp cloth with dish soap. The cabinet even started to smell nice. I wonder if some of the smoke was from the fried amplifier.
The cabinet stands on tubular legs, over three feet tall. They are shaped and are chrome plated. Much of the chrome is pitted, mostly near the floor as a result of mopping. I used Semichrome, a paste chrome and aluminum cleaner. It cleans off the corrosion and leaves a thin wax to prevent further deterioration. I later waxed the cabinet and legs with paste wax to preserve the shine.
Care must be taken when cleaning the glass scoring plates. The spacing is not consistent and I installed the numbers upside down the first time. It was easy to correct, but sure made me feel dumb.
Track
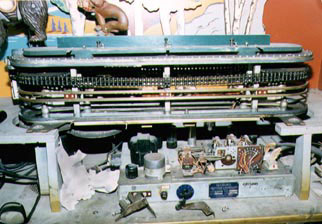
Now I get to work on the fun part, the mechanicals! The track consists of an oblong casting, running the full width of the cabinet. There are sprockets at either end that support a double chain. An electrical motor drives a toothed belt that turns one sprocket. A couple of copper rails conduct current from the target to the amplifier below.
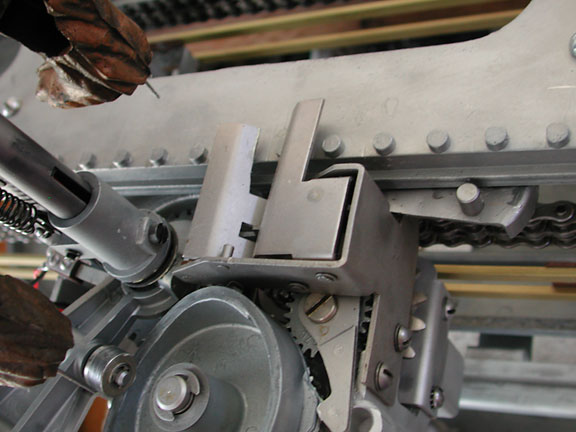
It was easy to disassemble the chain, sprockets, and other components off the track casting, once I figured out how to take the targets off! My game came with the dog as well as the bear. The order of removal was the top, wooden green cover, the top plate, the contact rails, and then the motor. The chain sprockets are not circular and so must be replaced pointing in the same direction relative to each other. Then the chassis isolation mounts, the chain with both sprockets, and the trunions were removed.
I did not realize the sprockets were not round. It is not clear if this was a result of poor manufacturing process or caused by later damage. Other restorers did not find this problem with their games. The symptom, if the sprockets were not correctly installed, is a binding of the chain at one point of the travel, and a too loose chain at other points of travel. By placing the sprockets correctly, relative to each other, the chain will make a full cycle without binding or getting loose.
Bear and Dog
The mechanism that causes the bear to raise up on his hind legs, rotate, and return to running the opposite direction is complex. It consists of a set of cams, gears, and levers. The bearÃs body is a rubber-like substance bolted to a metal frame. The frame supports the photo detection tube. The bear was cleaned with a tooth brush and dish soap and the frame was cleaned in the ultrasonic cleaner. I almost hated to clean the bear as the dust and dirt in the crevasses of the fir added depth and color to the bearÃs coat.
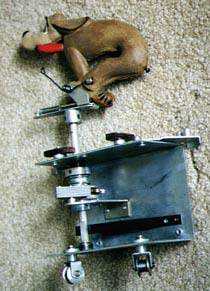
The bear did not need any cosmetic attention but the dog did. The original game supplied a dog to chase the bear. It runs on the same track and is moved by the same chain. When chasing the bear, the dog has a fierce face, teeth showing. However, when the bear turns as a result of getting shot, the dog also turns and runs away. The face on this side of the dog is wide eyed and scared.
The dog is a solid rubber animal and the paint was flaking off his body around the face and front legs. He was also missing a tail. I matched the paint and airbrushed on a new face. (My father wrote an article for the National Watch and Clock CollectorÃs journal on color matching and this is reprinted with permission on my web site at: www.sandsmuseum.com) I hand painted the red tongue. The tail was made out of tufts of yarn of the correct color. I needed to fabricate a new spring out of piano wire in order to keep the dog hopping along.
The carriages for each of these targets consisted of a frame and various mechanical components. The rotation of the bear and dog is smoothed through use of a leather clutch discs, which are attached to the gears that follow the drive chain. The discs allow some play in the metal mechanism and prevents mechanical shock. These clutch discs can be cut from untanned leather.
I needed to fabricate a spring and follower for the electrical contact portion of the bear carriage and so I machined a computer stand-off to the right size. One of the contacts carries the photo tube signal from the amplifier, with ground being the return path. The other contact and ground are used to power the light that glows through the bearÃs eyes and mouth.
Spring tension controls how quickly the bear stands up and then returns to running. This needs to be carefully tensioned to allow for smooth and realistic motion.
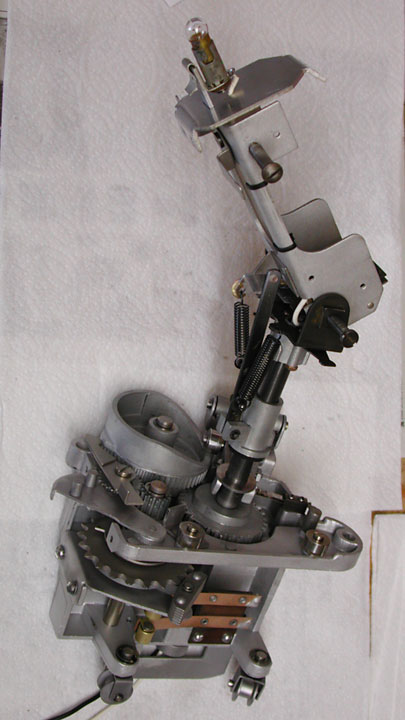
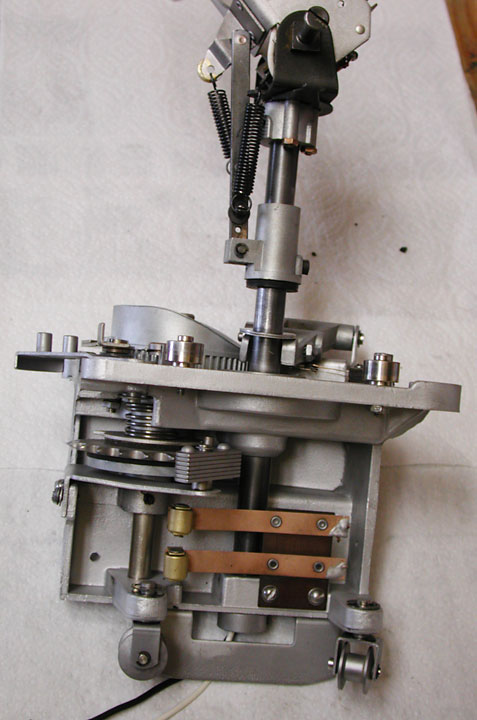
This shows the carriage for the bear. The gears engage the chain that runs the circle of the track. The slanted gear on the top left has a roller follower that raises and lowers the bear when the chain reverses. The bear form is attached to the top part of the carriage, with the black screws being the pivot points for the legs. The lamp at the top makes the eyes and mouth glow when the bear gets hit, turned on by the leaf switch seen at the base of the pivot for the bear. The contact followers at the bottom provide a signal to the amplifier when the light hits the lens and power for the lamp.
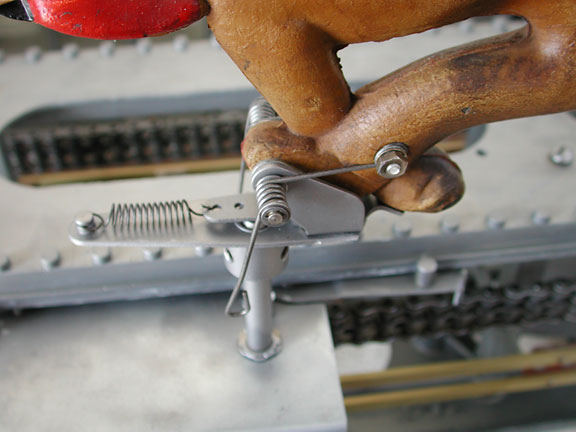
These are the ratchets that hold the bear in place when he is raising up and rotating. They catch on the nubbins on the outside of the track. When adjusted correctly, they are nearly silent, relying on the inertial of the change in direction to lower them into the engaged position. The cam that raises and lowers the bear is just below the flappers.
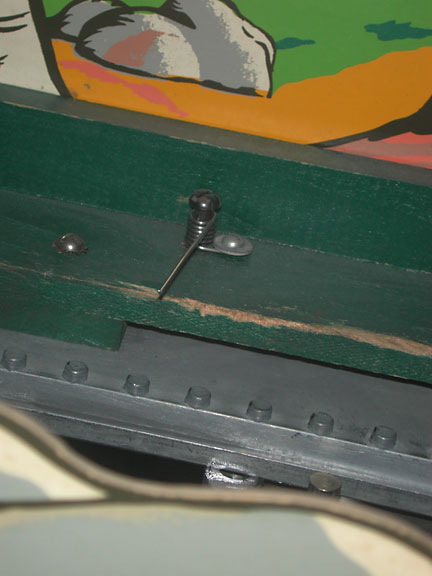
This shows the correct spring used to trip the bear's feet, giving the impression that he is running. Many operators replaced the springs with a straight strip of metal which provided the same tripping action to the wires extending from the bottom of the bear's feet. However the strips of metal provided no shock absorbtion and so the bear's feet suffered additional wear as a result.
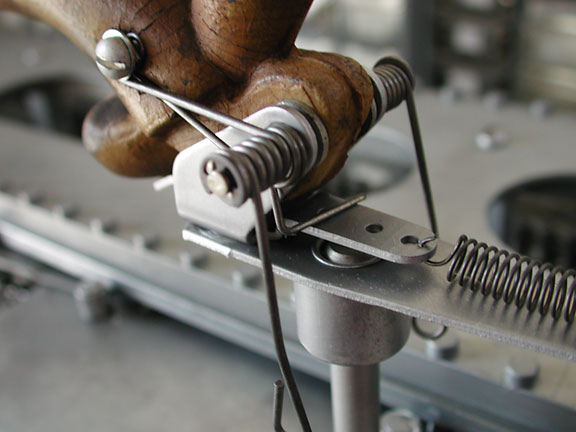
The dog has several springs used to give the appearance of running. Because the dog runs both directions, he needs trip wires on both sides. He also needs a return spring so that once rocked backwards, he returns, ready to rock backwards again. The coil spring to the right of the picture keeps the dog pointing forward, allowing him to wiggle slightly when rounding the turn and to take up the shock when the dog changes direction.